
Editing shapes in the Inspector
Some shapes come with unique customization options, which you’ll find in the Inspector. For example, you can choose different start and end point styles with arrow ![]() shapes. Or, if you added a polygon
shapes. Or, if you added a polygon ![]() or a star
or a star ![]() shape, you can adjust the number of sides and points respectively using the sliders.
shape, you can adjust the number of sides and points respectively using the sliders.
How to edit a polygon’s corners and sides in the Inspector
Editing corners
To adjust corner size, select a shape and hover over it to reveal the circular corner radius handles, which are located just inside the shape. Drag any handle to change all corners to the same size. You’ll also see the corner size’s numerical value change as you drag.
Don’t see any corner handles? Your shape could be too small to display the handles. Try zooming in to your shape.
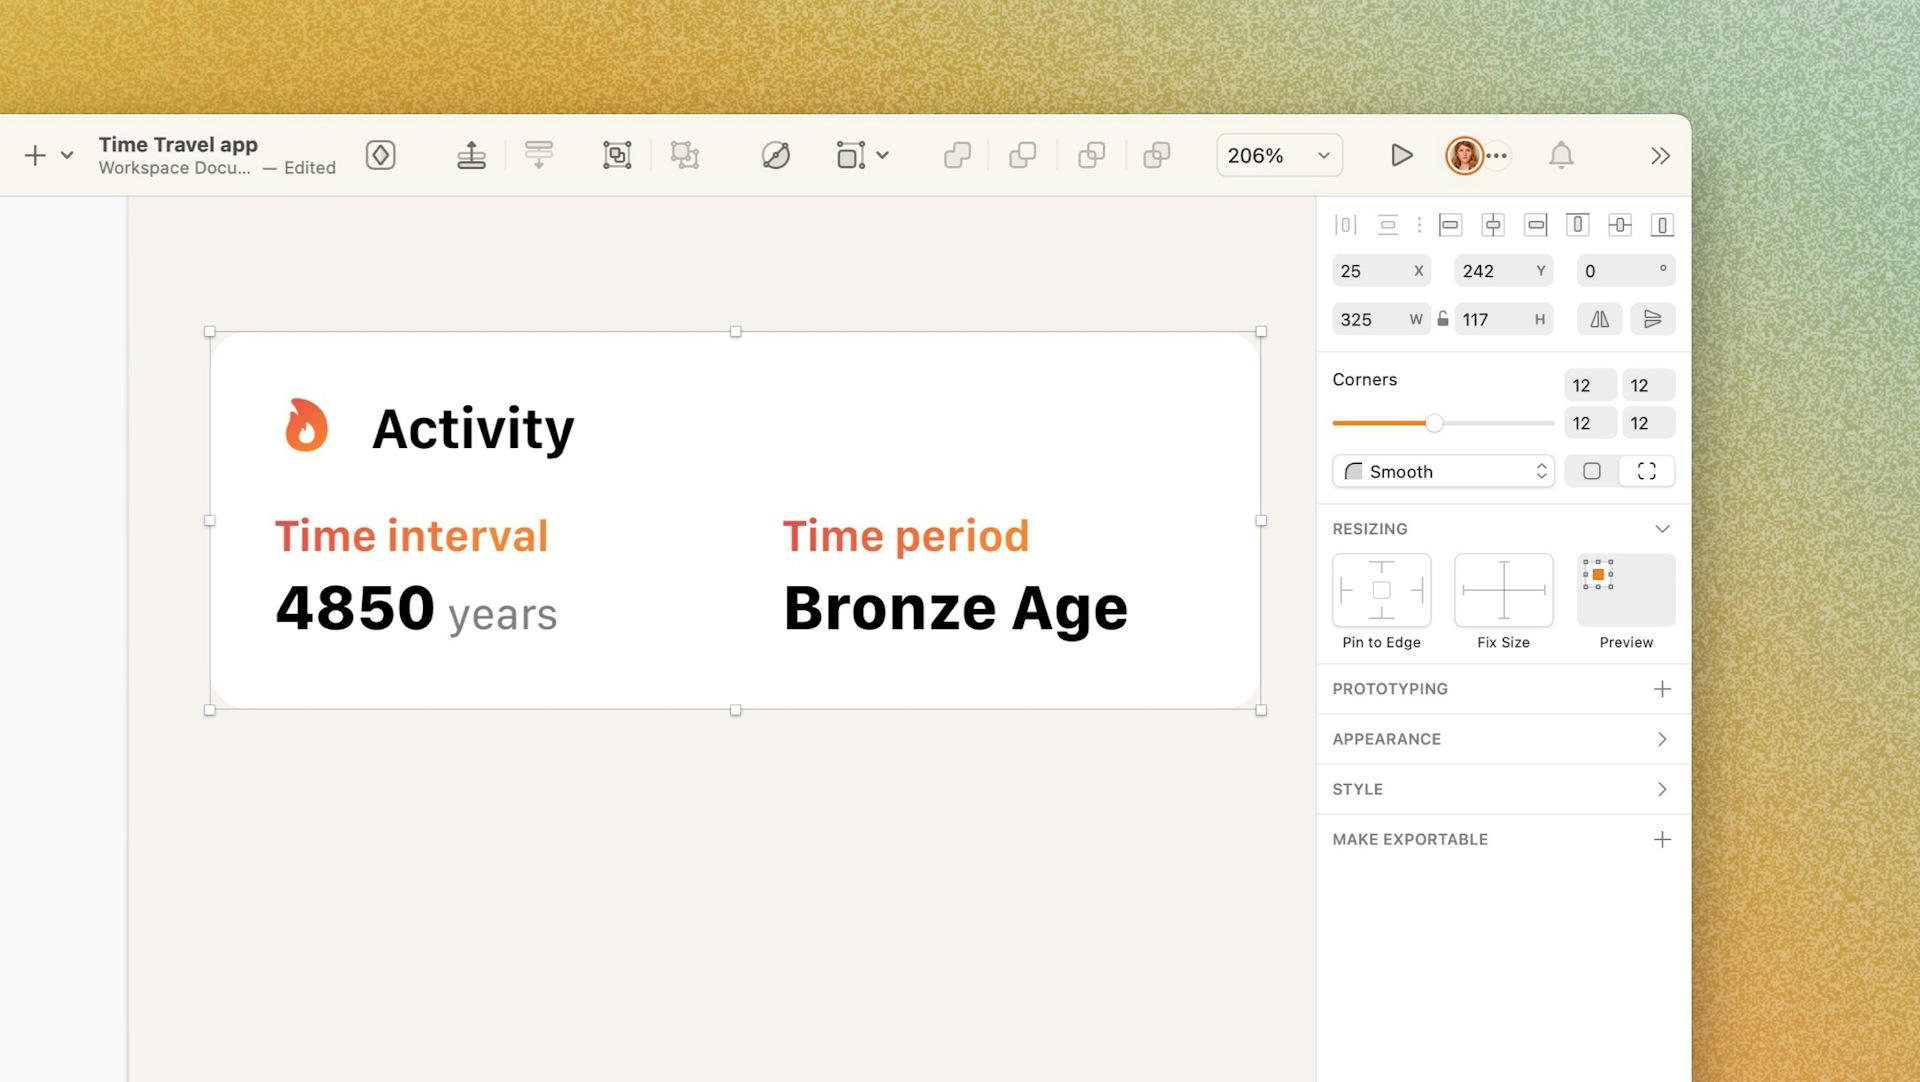
To assign one or more corners with specific values, select the Individual corners ![]() mode in the Corners section of the Inspector.
mode in the Corners section of the Inspector.
Drag the corner handle to adjust all corners in a rectangle
If you’re working directly from the Canvas you can also hold ⌘ to adjust only the corner you’re dragging.
Drag while holding the Command key to adjust a single corner
When you drag a corner, you’ll also adjust other corners of the same size. This way, you can easily control pairs of corners at the same time, or single out a corner and edit the other three.
When you drag a corner, you’ll also adjust other corners of the same size
Editing corners in the Inspector
When you’re editing rectangle corners, you can toggle between Individual ![]() and Uniform
and Uniform ![]() modes in the Inspector’s Corners panel.
modes in the Inspector’s Corners panel.
- Individual mode: You’ll find four input fields arranged in a 2x2 layout matching the position of each corner in a non-rotated rectangle.
The Corners panel in the Inspector, with Individual mode enabled
Keep in mind that the slider ignores zero values. For example, if you have two corner values set to 8 and two corners at 0, using the slider will only adjust the size of non-zero corners.
- Uniform mode: When you change from Individual to Uniform mode, we’ll pick the largest value amongst the four corners in your rectangle by default. However, if you’ve selected a corner input field in Individual mode and then change to Uniform, we’ll use that input as the new uniform value in your rectangle — even if it’s not the largest value.
How to switch to Uniform mode and edit corners
Choosing corner styles
You can apply multiple corner styles (Smooth, Rounded, Angled, Inside Square and Inside Arc), changing how the layer’s corners look. Head to the Corners section in the Inspector while editing any shape and pick the one you want from the dropdown menu.
Smooth corners have curvature continuity, enabling you to create ‘squircles’ that Apple uses in its interfaces.
You can apply different corner styles from the Corners panel in the Inspector
Flipping shapes
You can flip shapes horizontally ![]() or vertically
or vertically ![]() using the two buttons in the Inspector. These states will stay selected (so you can click again to reverse the change) unless you flatten the shape using Layer > Combine > Flatten.
using the two buttons in the Inspector. These states will stay selected (so you can click again to reverse the change) unless you flatten the shape using Layer > Combine > Flatten.
How to vertically flip a shape via the Inspector
Rotating shapes
You can quickly rotate any shape you’ve selected by holding ⌘ and dragging one of its selection handles.
Quickly rotate a shape by holding the Command key while dragging a selection handle
Holding ⇧ when you rotate a shape in 15° increments.
To rotate a shape, you can enter a value in degrees in the Inspector. Enter positive or negative values to rotate the shape clockwise or counter-clockwise respectively.
Alternatively, select a shape and press ⌘⇧R, then click and drag anywhere outside your shape to rotate it.
Rotate a shape by entering a value via the Inspector
To change the axis on which your shape rotates, simply click and drag the crosshair at its center to the point you want to rotate around. To reset the center point, simply select your shape again.
Click and drag a shape’s center point crosshairs to change its rotational axis
You can commit your changes and reset the rotation value to 0° by flattening the shape with Layer > Combine > Flatten.
Editing shapes in vector editing mode
For the full guide on using the vector editing tool, head over to the vector editing section.
To edit a shape in vector editing mode , either double-click on it, or select it and press the Return ↵ key.
When you enter vector editing mode, you’ll see circular points connected together by paths. Click on any of the points and drag them to change a layer’s shape.
While in vector editing mode, click and drag on a point to change a layer’s shape
To insert a new point, enter vector editing mode, hover over a path and click. To delete a point, select it and press the Delete ⌫ key.
While in vector editing mode, click on a shape’s path to insert a new point
The paths between your shape’s different points can be straight lines or Bézier curves, depending on the kind of point connecting them. Double-click on a straight point connecting straight paths to change it to a Bézier curved point.
When you change a point to create a curved path, you can use the two handle control points that appear to adjust the curve.
Use the handle control points to adjust a Bézier curve
Flattening your shape by selecting Layer > Combine > Flatten will create points at each end of the curve.
Using the Transform tool
Use the Transform tool ![]() to skew or otherwise change a shape.
to skew or otherwise change a shape.
Select one or more shapes and head to Layer > Transform > Transform. Alternatively, use the keyboard shortcut ⇧⌘T.
The Transform tool ![]() adds points to each corner of your shape(s), as well as points between each corner. Click on a point and drag it to transform and skew your shape(s).
adds points to each corner of your shape(s), as well as points between each corner. Click on a point and drag it to transform and skew your shape(s).
Use the Transform tool or skew or otherwise change a shape
If you click and drag on a point between two corners, you’ll move both corners at the same time.
Click and drag on a point between two corners to move them together
When you click and drag on a corner point, an opposite corner will move in the opposite direction at the same time — depending on whether you’re dragging horizontally or vertically. To control a single corner only, hold down ⌘.
Using the Scissors tool
Use the Scissors tool ![]() to cut away paths from shapes.
to cut away paths from shapes.
Select the shape you want to edit, enable the Scissors tool via Layer > Path > Scissors and click on any paths to remove them. Alternatively, open the Tools menu ![]() in the Toolbar and select the Scissors tool
in the Toolbar and select the Scissors tool ![]() from there.
from there.
Keep in mind that the Scissors tool only affects lines or borders — and not fills.
As with most tools in Sketch, you can add the Scissors tool directly to the Toolbar via View > Customize Toolbar.
Use the Scissors tool to remove paths from a shape
When you’re done cutting paths, click outside of the shape, or press Escape Esc or Return ↵.
Using the Rotate Copies tool
The Rotate Copies tool ![]() takes a single shape and rotates copies of it around a point.
takes a single shape and rotates copies of it around a point.
Select a shape and head to Layer > Path > Rotate Copies, enter how many copies you want to create, then click Rotate.
You can also add the Rotate Copies tool ![]() directly to the Toolbar via View > Customize Toolbar.
directly to the Toolbar via View > Customize Toolbar.
Use the handle that appears in the centre to set where you want your copies to be positioned. When you’re done, press Escape Esc or Return ↵.
How to use the Rotate Copies tool
In version 53.1 of the Mac app and earlier, Rotate Copies will create a compound shape of your copies, like a Boolean operation does. To turn the shape into separate layers, use Layer > Combine > Break Apart.