# Okta
> Learn how to set up automated SCIM user provisioning with Okta for your Sketch Workspace, including SSO, group assignment, and access levels.
**URL:** https://www.sketch.com/docs/getting-started/single-sign-on/scim-provisioning/okta/ | **Last updated:** 2026-02-26
---
This guide walks you through setting up SCIM provisioning with [Okta](https://www.okta.com/) for your Sketch Workspace. If you need help along the way, [contact us](/support/contact/?topic=enterprise&subject=other&summary=I%20need%20help%20setting%20up%20SSO%20or%20SCIM.%0A%0A---%0A%0AAdd%20any%20other%20details%20below%3A%0A) and we’ll help you out.
> **Note:** **[Already use Okta for SSO?](#existing-okta-sso-configuration)**
You’ll need to create a new custom app to enable SCIM. The Gallery app doesn’t support SCIM provisioning.
## 1. Create a custom Okta app
Sign in to your Okta account and open the **Admin console**. Make sure you can create and configure applications and groups.
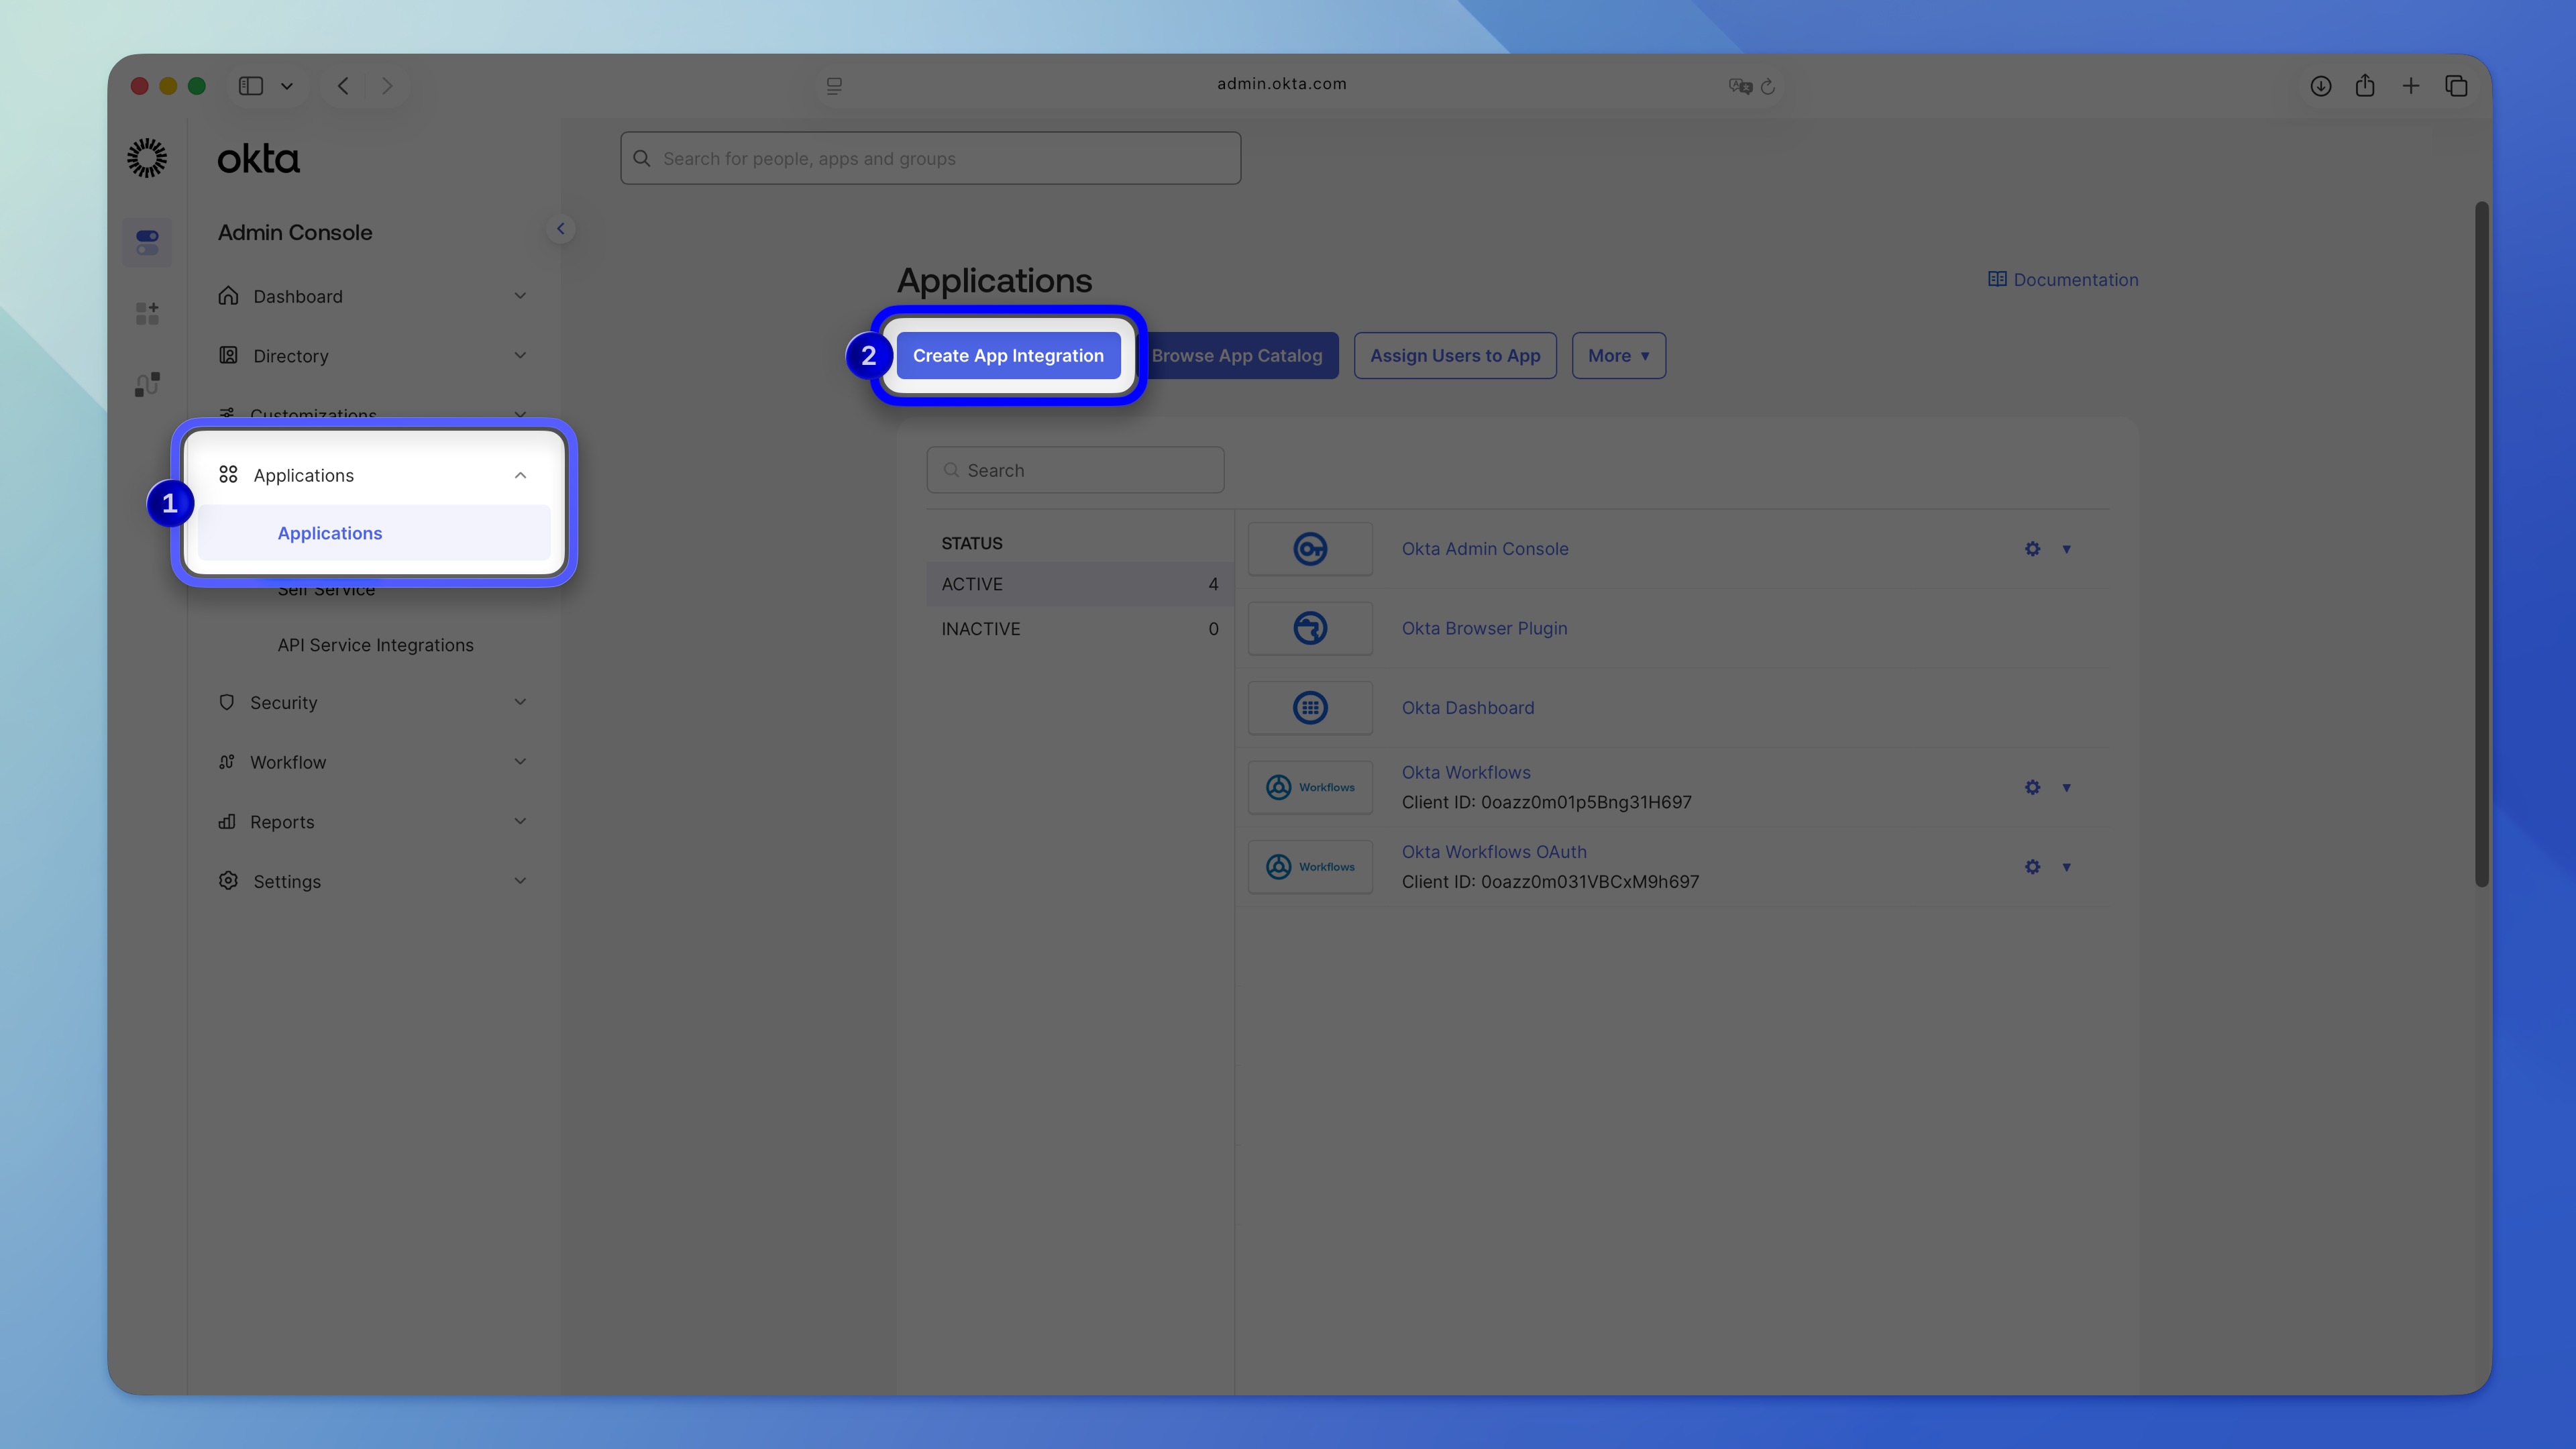
1. On the left sidebar, click **Applications** > **Applications** > **Create App Integration**.
1. Select **SAML 2.0** from the list.
1. Name your app.
### Configure SAML SSO
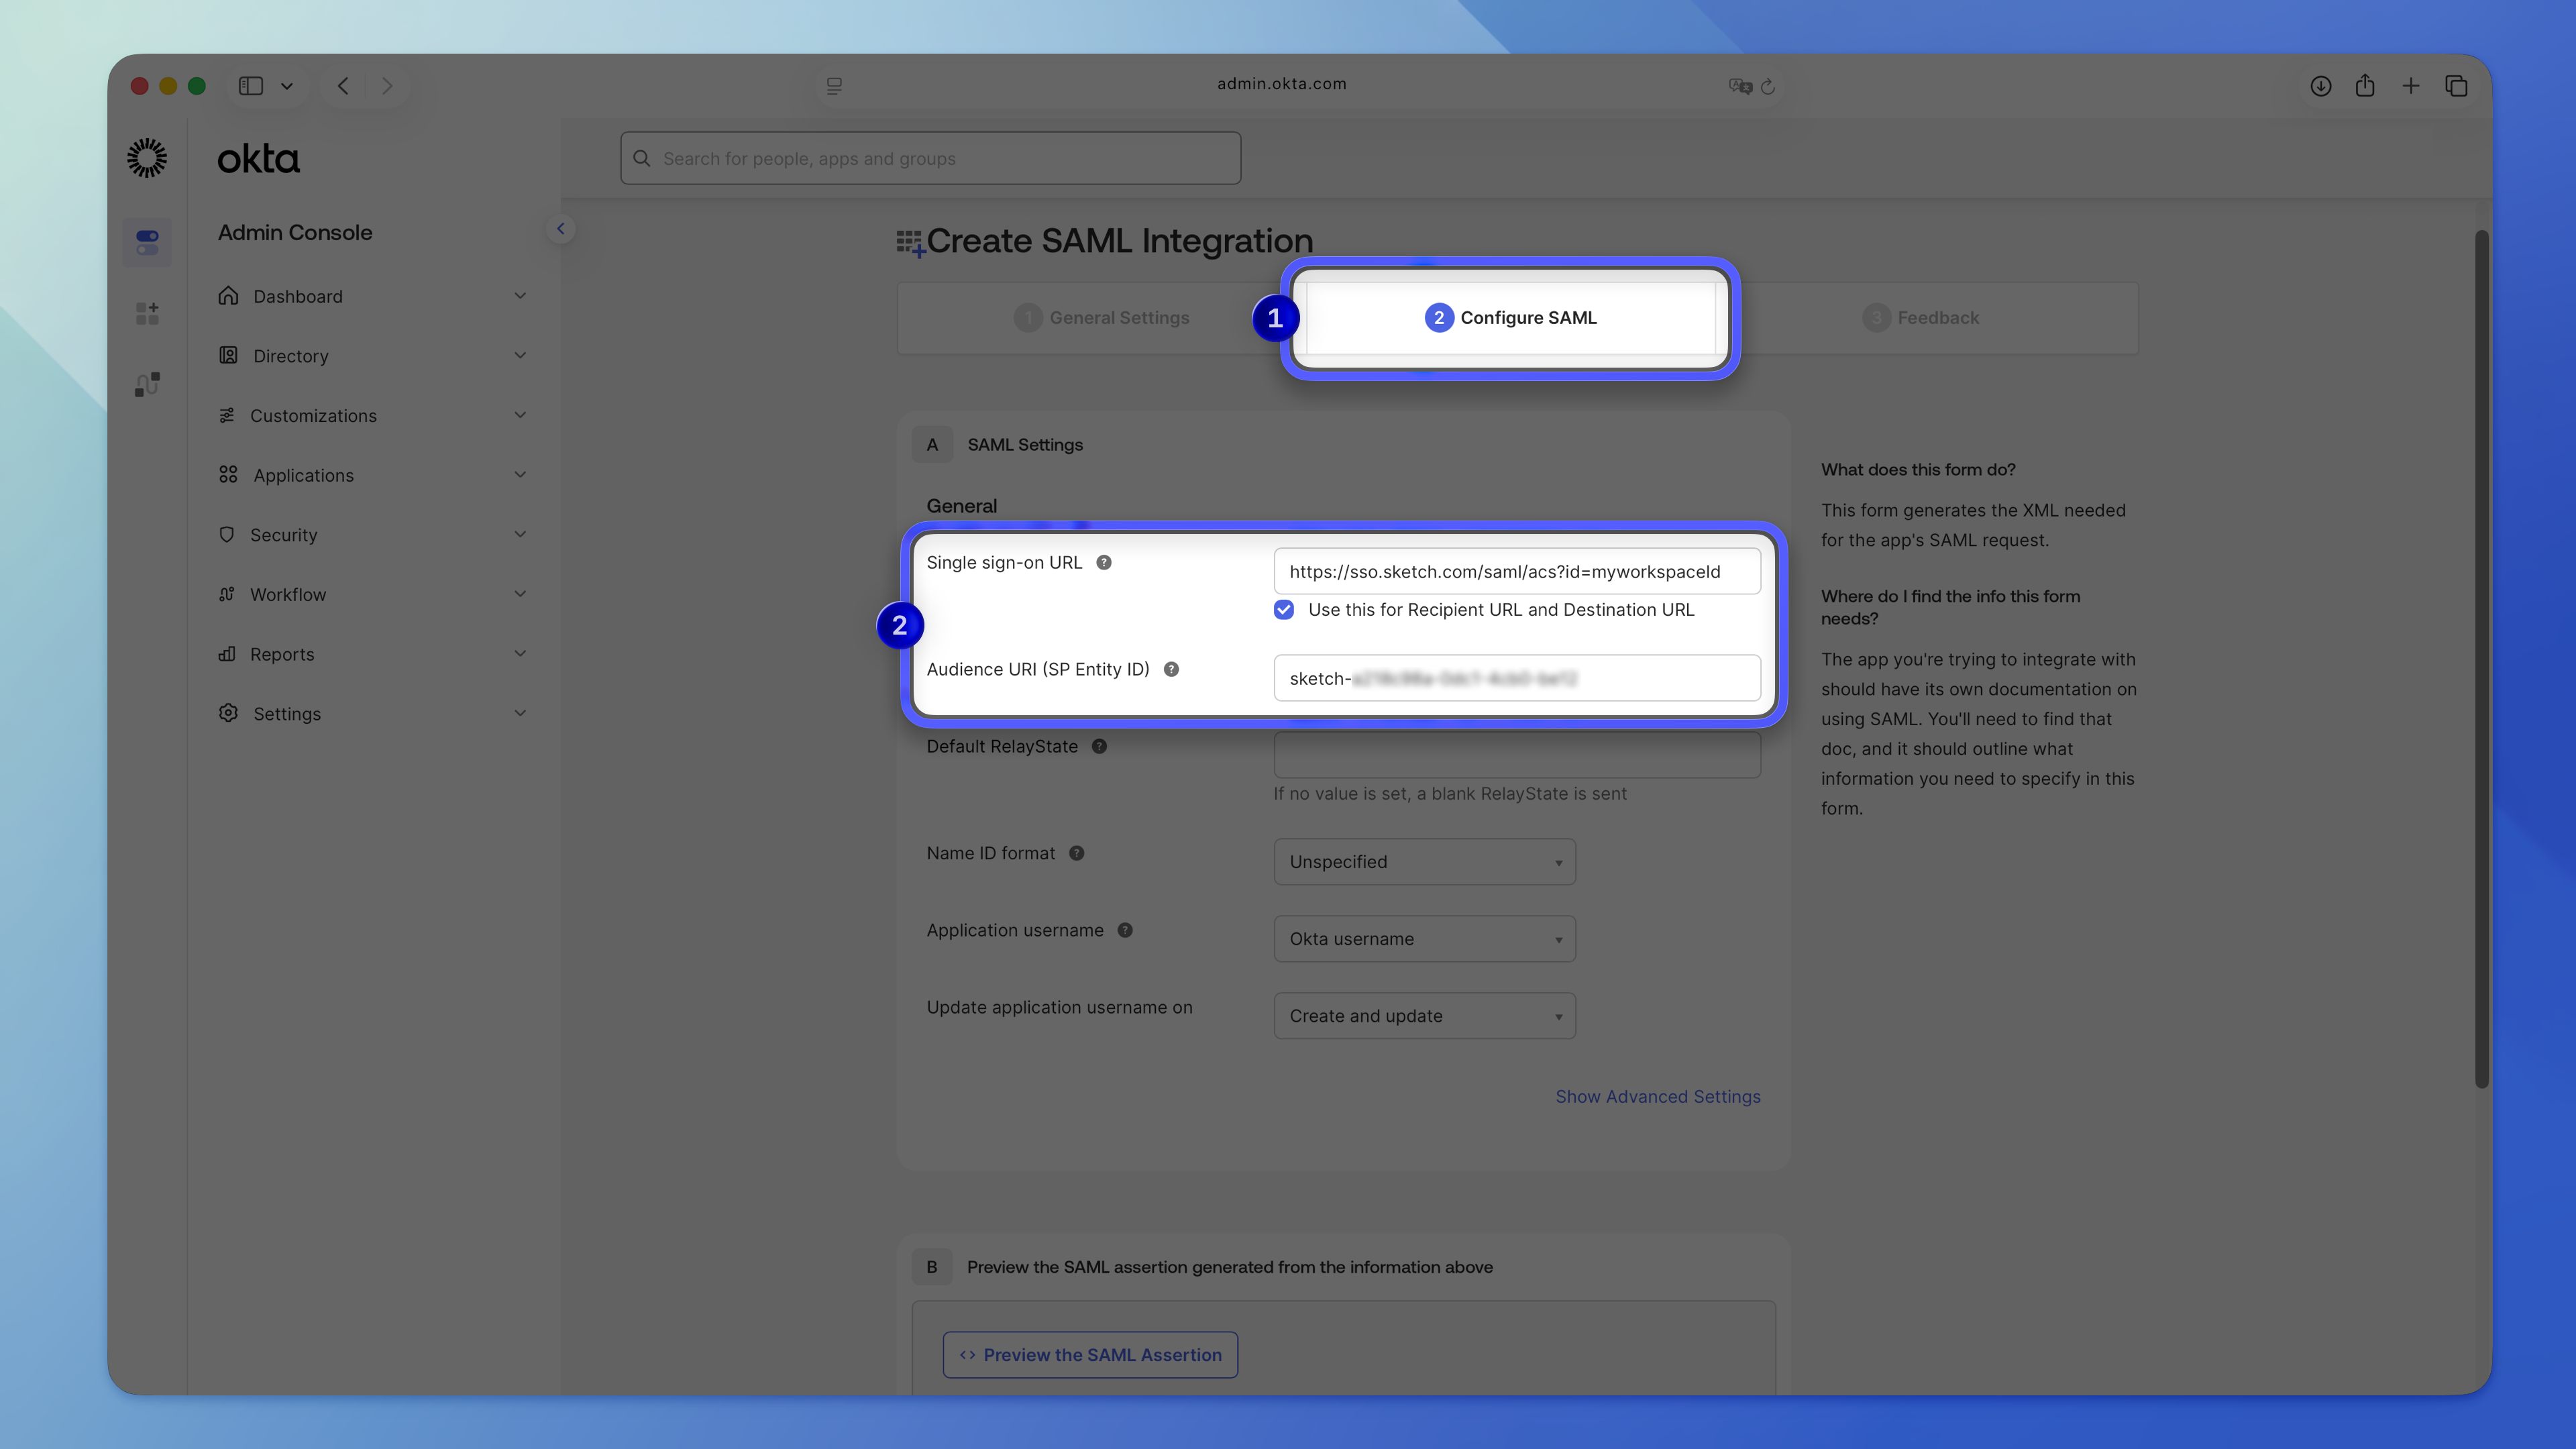
On the next screen, you’ll need to provide the SAML SSO configuration data from the web app.
1. Paste your Workspace ACS URL in the **Single sign-on URL** field.
1. Paste your Workspace Entity ID in the **Audience URI** field.
To get these values, sign in to the web app as an Admin and go to **Settings** > **[Single Sign-on](/workspace/settings/sso)**.
1. Leave the rest of the form with the default values and click **Next**.
You’ll see an additional step where Okta asks you to provide data on how you configured the app. This step is optional — you can skip it.
### Add SAML attribute statements
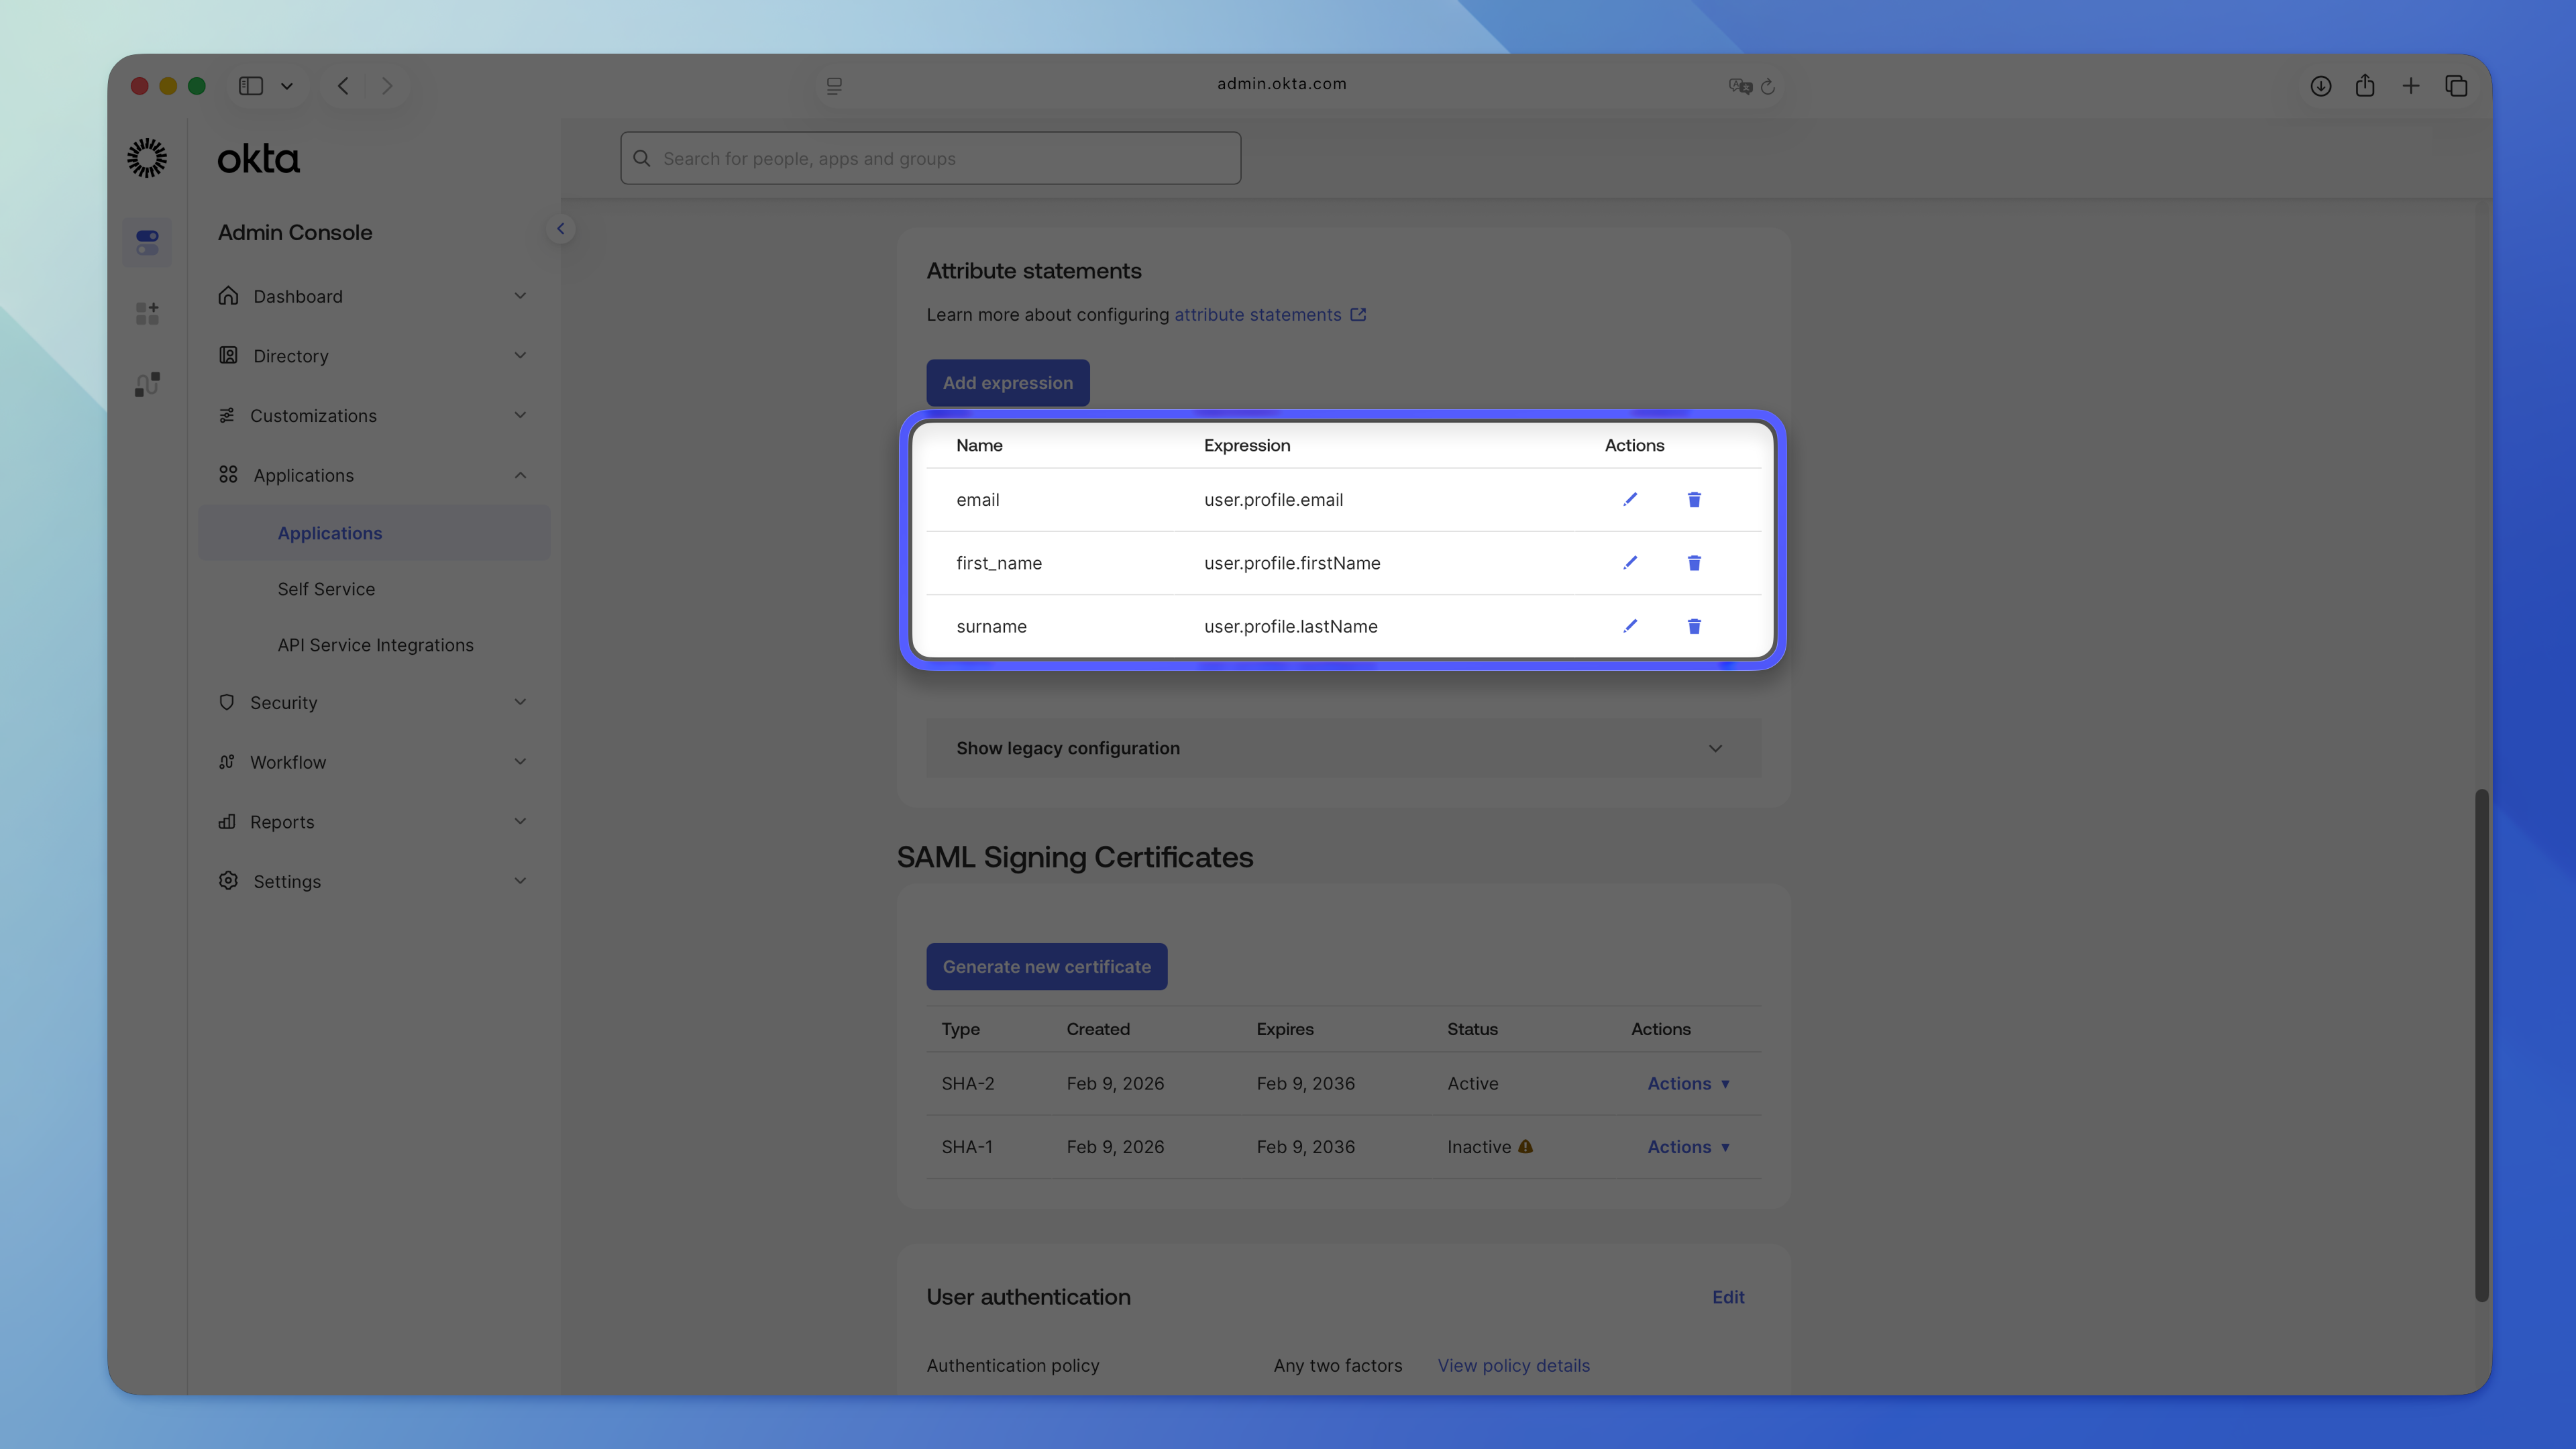
After you create the custom app, open the **Sign On** tab and scroll to **Attribute Statements**. Click **Add expression**, then add the following:
1. **Email**
- Name: `email`
- Expression: `user.profile.email`
1. **First Name**
- Name: `first_name`
- Expression: `user.profile.firstName`
1. **Surname**
- Name: `surname`
- Expression: `user.profile.lastName`
### Upload the XML metadata file to your Workspace
1. Scroll down to the **SAML Signing Certificates** section.
1. Click **Actions** for the active certificate.
1. Click **View IdP metadata**.
1. Press ⌘S to save the XML file (IdP metadata).
Switch back to the web app and upload the downloaded XML file.
> **Note:** For more details on uploading metadata, see our [finishing SSO setup documentation](/docs/getting-started/single-sign-on/setting-up-saml-sso/finish-setting-saml-sso/).
## 2. Configure SCIM
### Activate SCIM
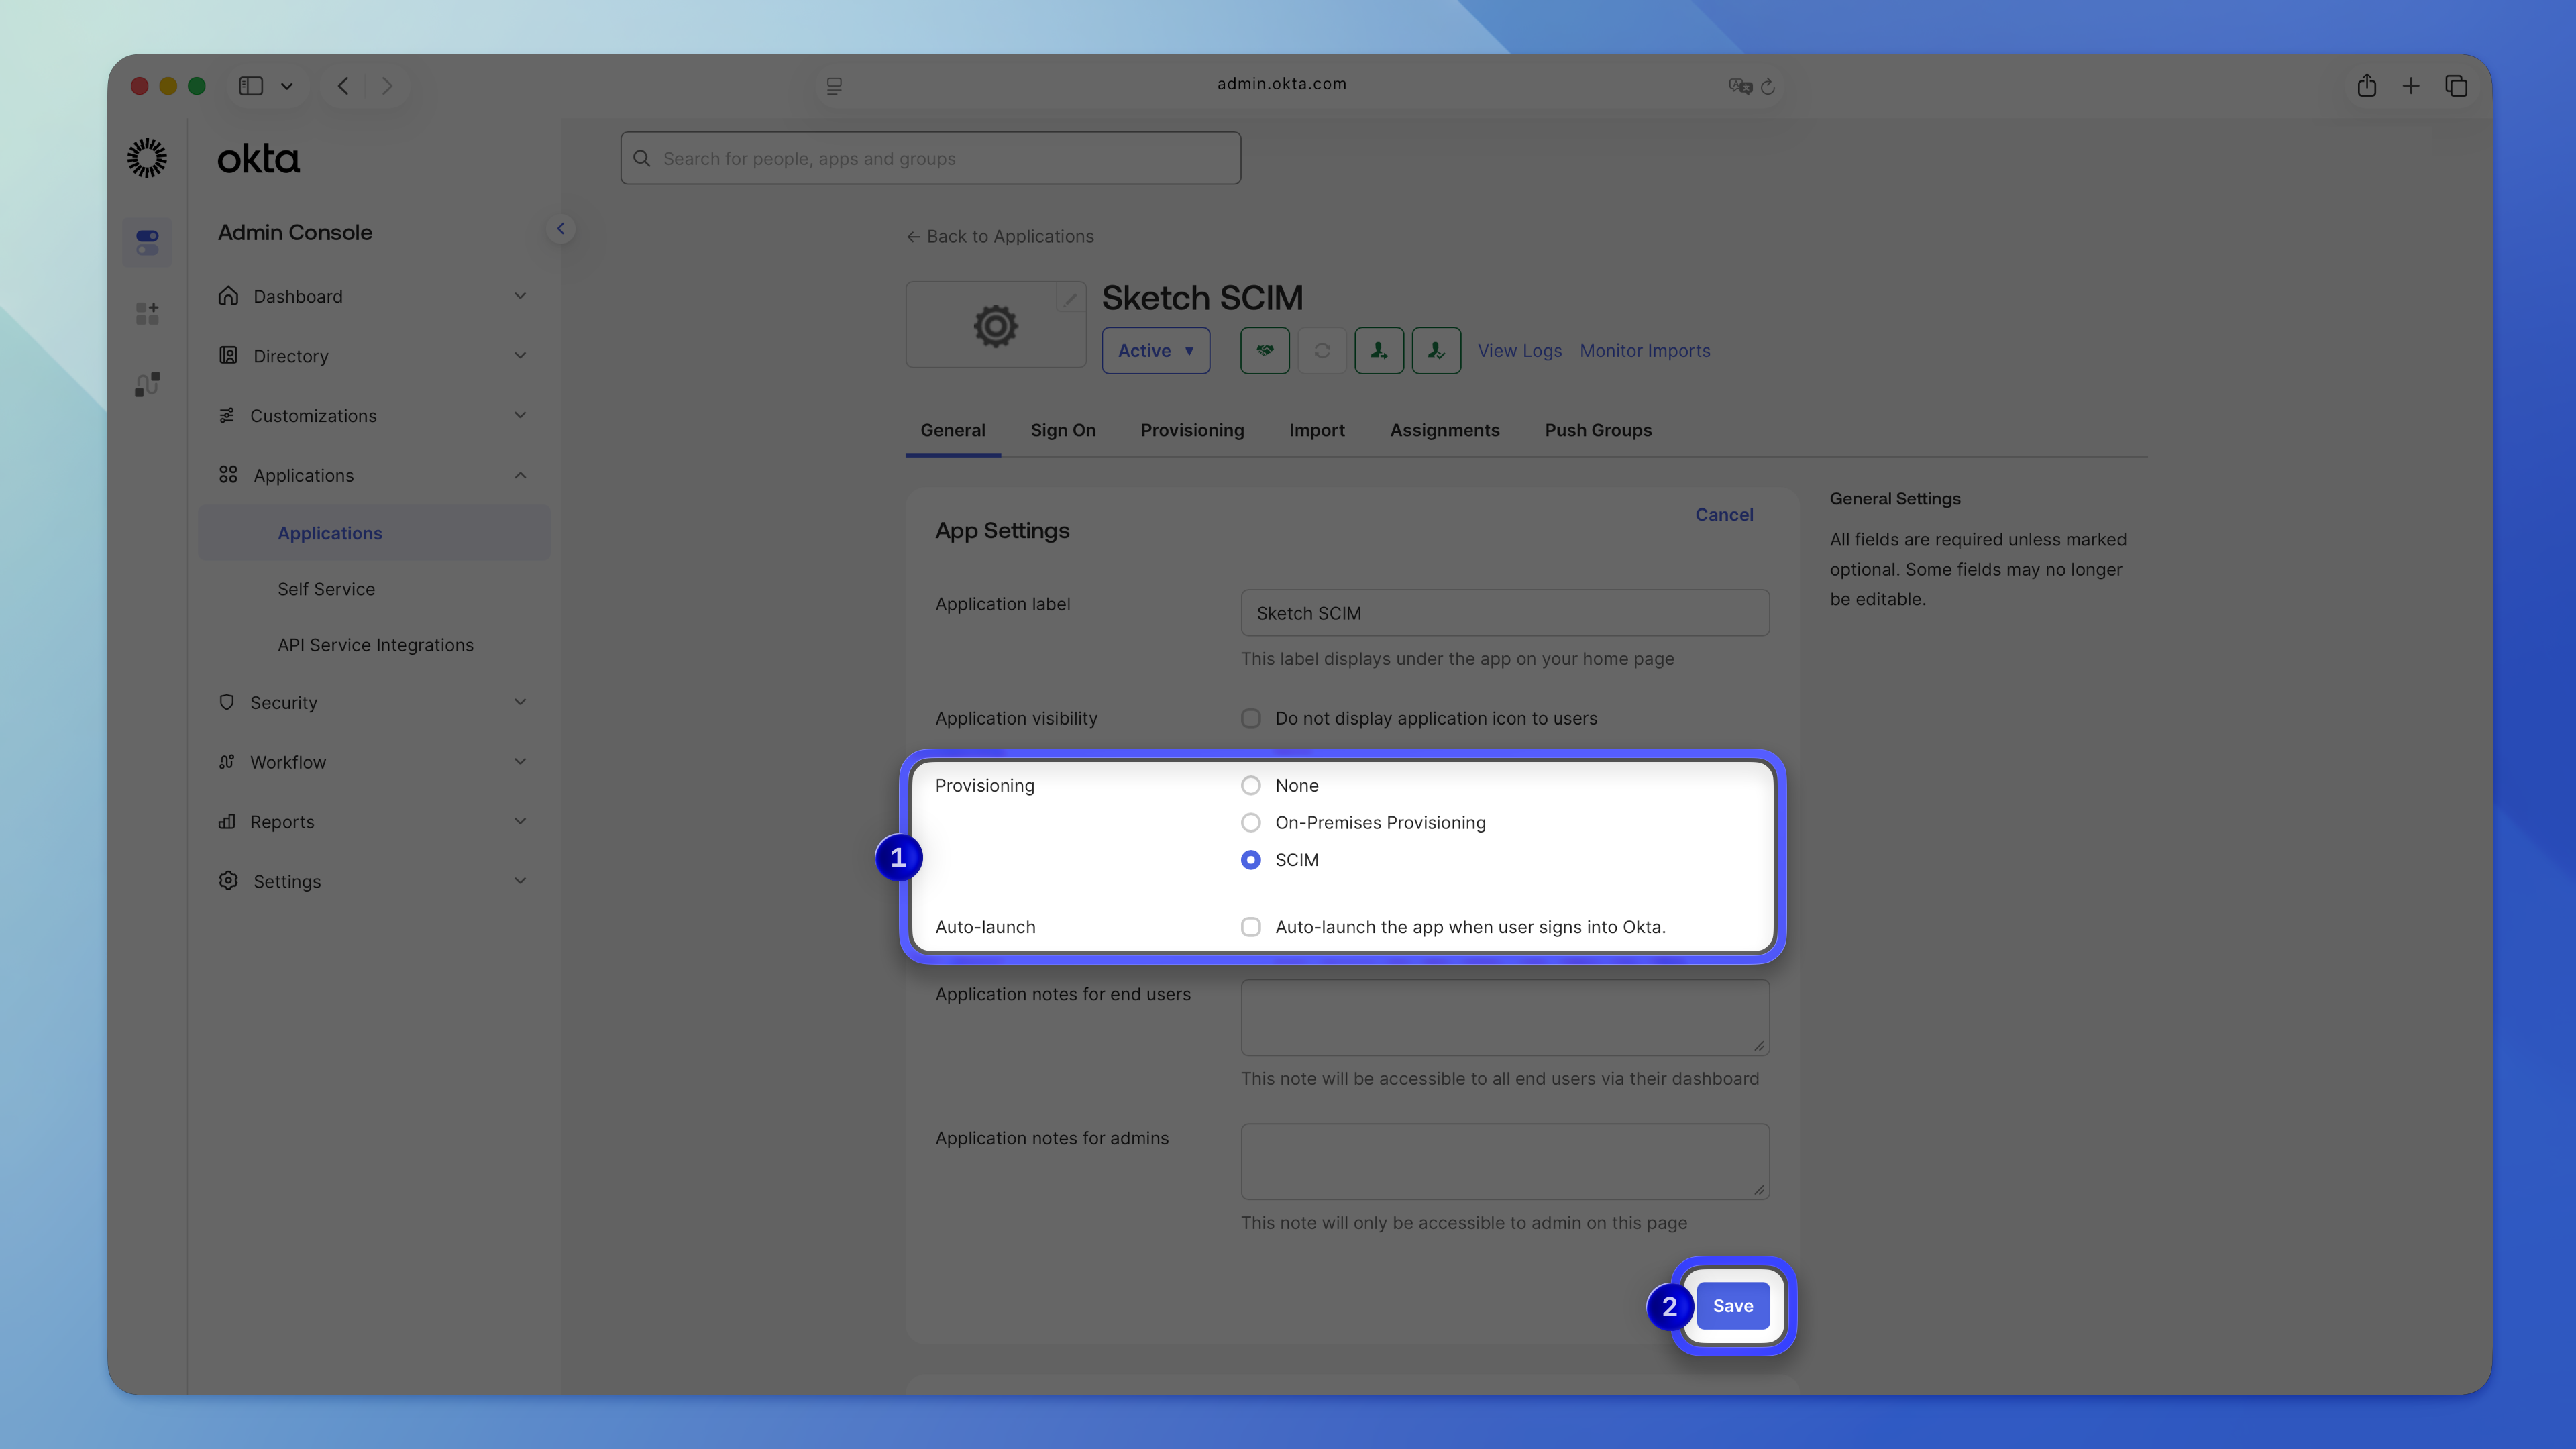
1. Go to the **General** tab and click **Edit** in the **App Settings** section.
1. Select **SCIM** in the **Provisioning** section.
1. Click **Save**.
### Configure provisioning
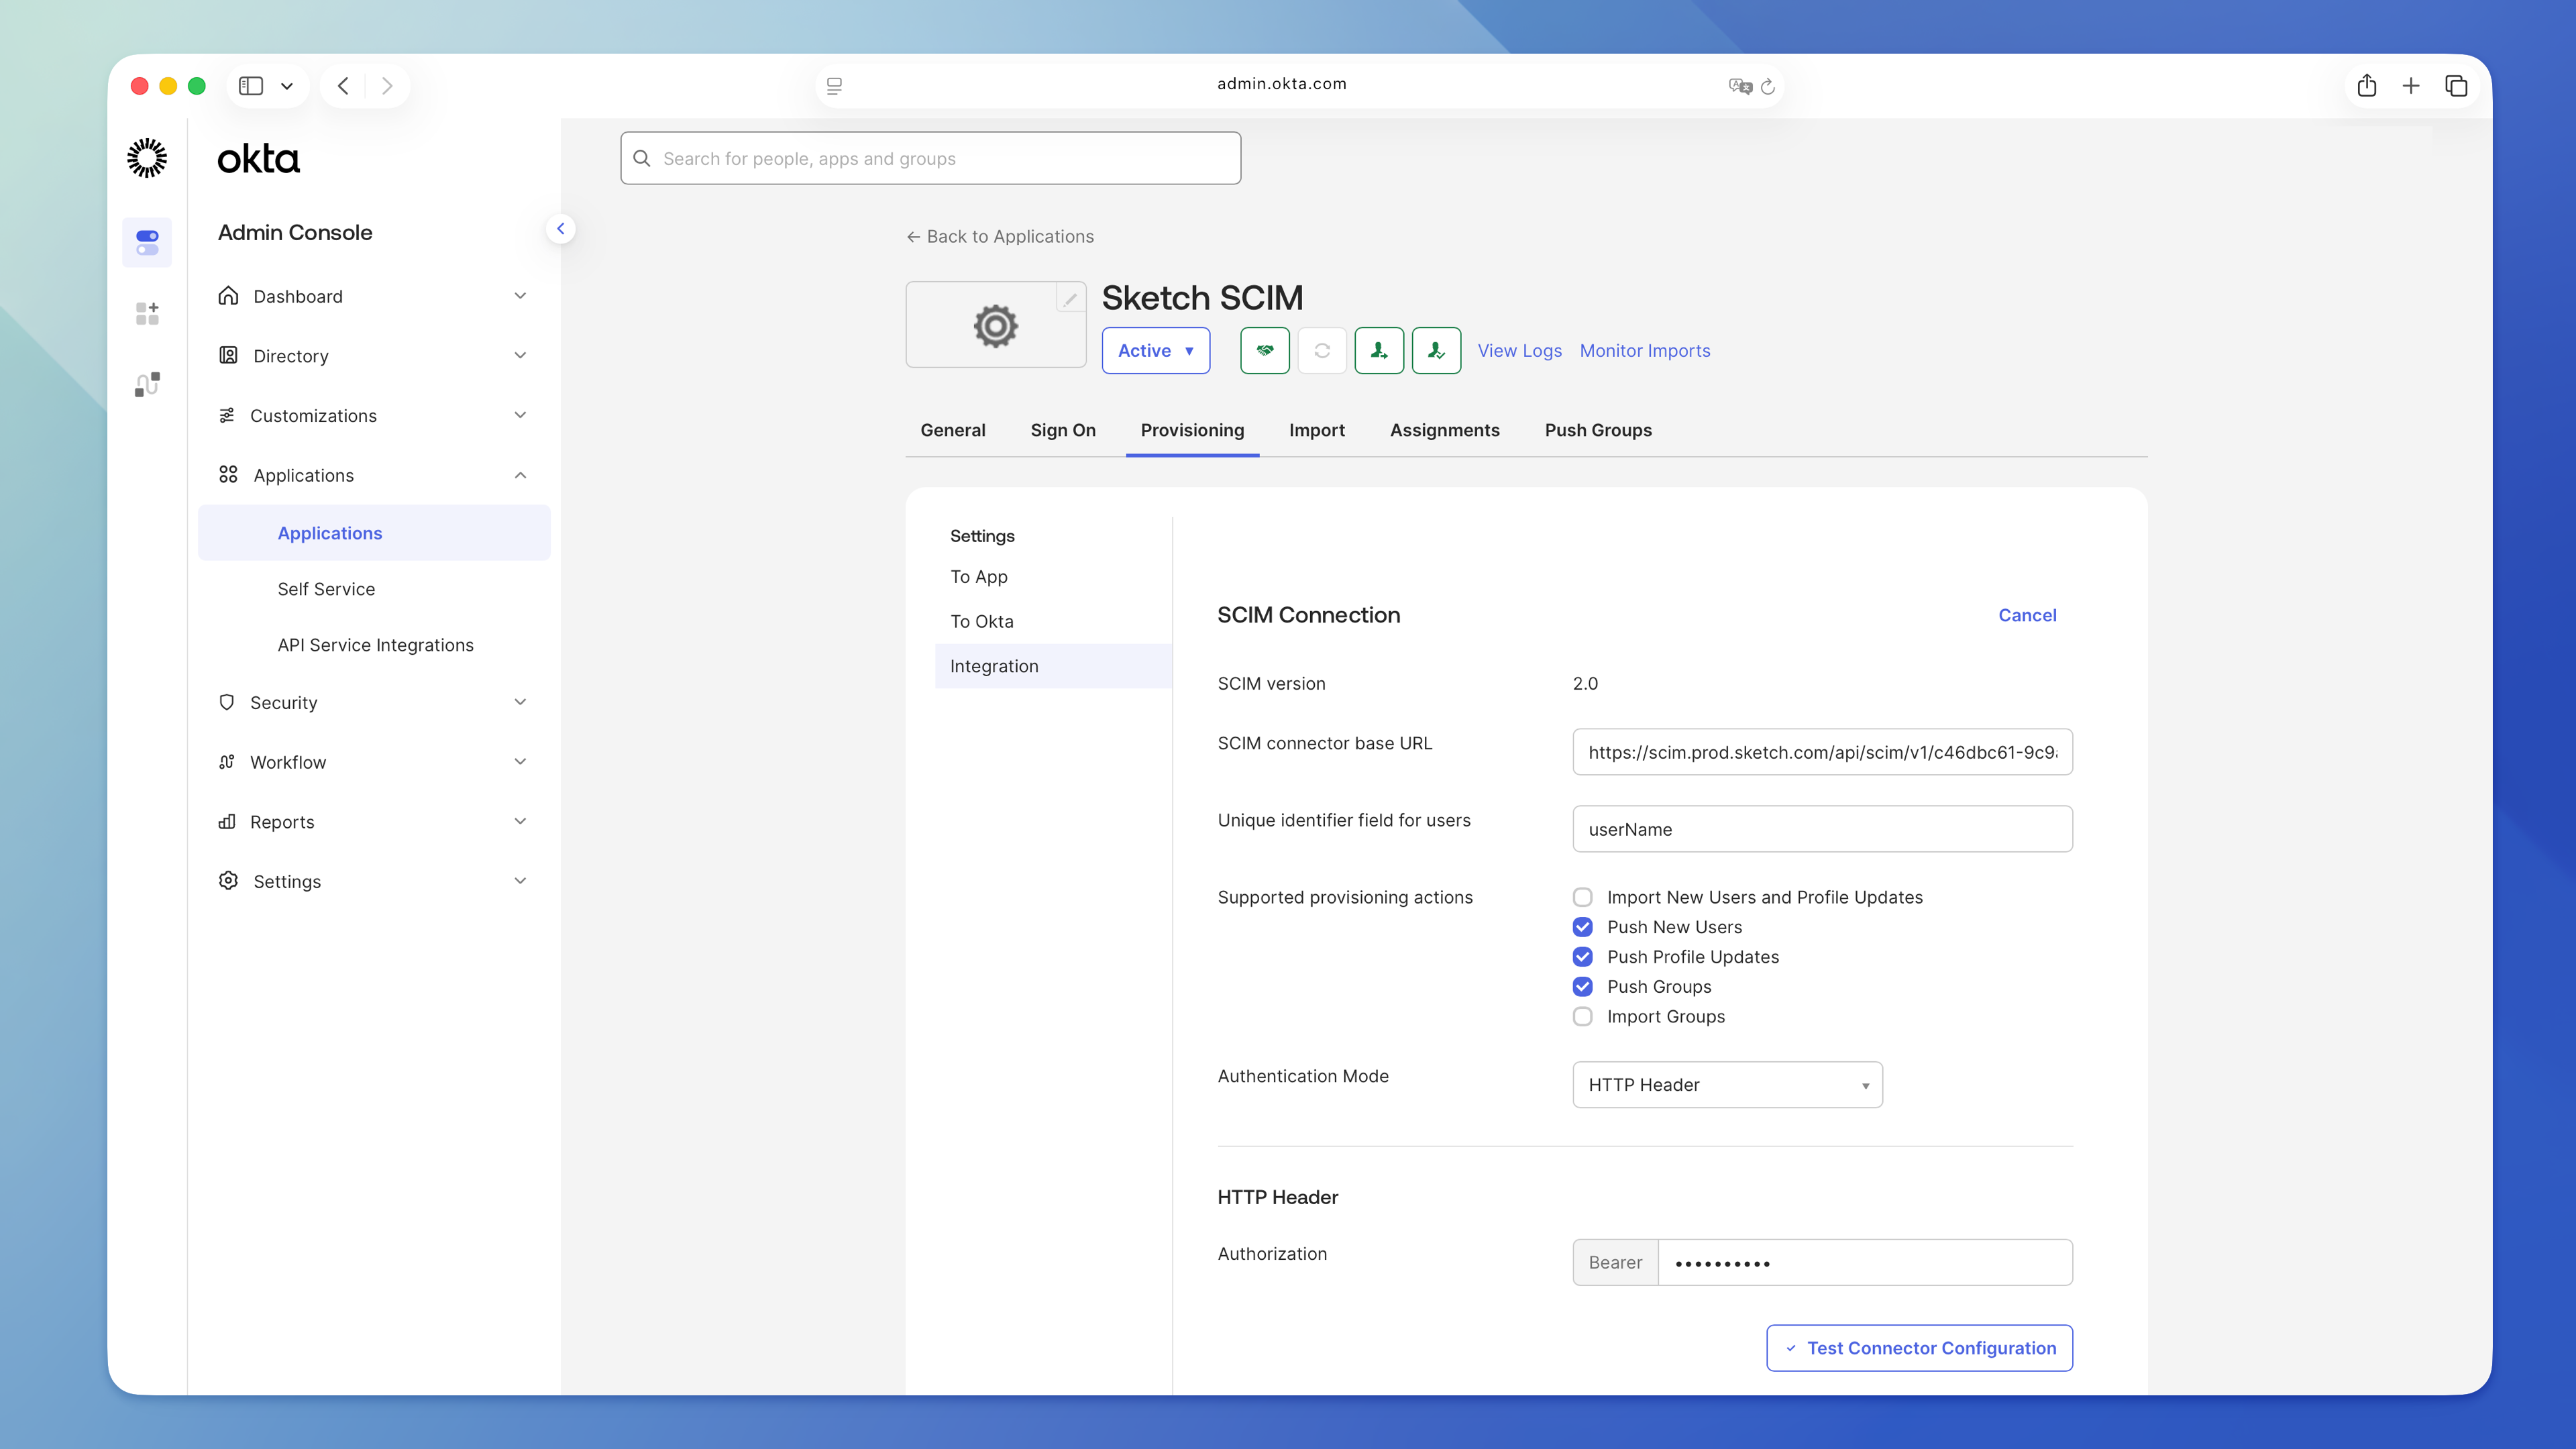
To connect Okta to your Sketch Workspace, you’ll first need to enable SCIM and collect a few values:
1. Open the web app and go to **Settings** > **[Single Sign-on](/workspace/settings/sso)**.
1. Click **Enable SCIM**.
1. Have the **SCIM Base URL** and the **SCIM token** ready.
Switch to your Okta custom SCIM app:
1. Open the **Provisioning** tab.
1. Click **Edit**.
1. Paste the **SCIM Base URL** from the web app in the **SCIM connector base URL** field in Okta.
1. Type `userName` in the **Unique identifier field for users**.
1. Select **HTTP header** in **Authentication Mode** and paste the SCIM token in the **Bearer** field.
1. Click **Test Connector Configuration**.
1. Click **Save** if your connection test is successful.
### Create assignment groups
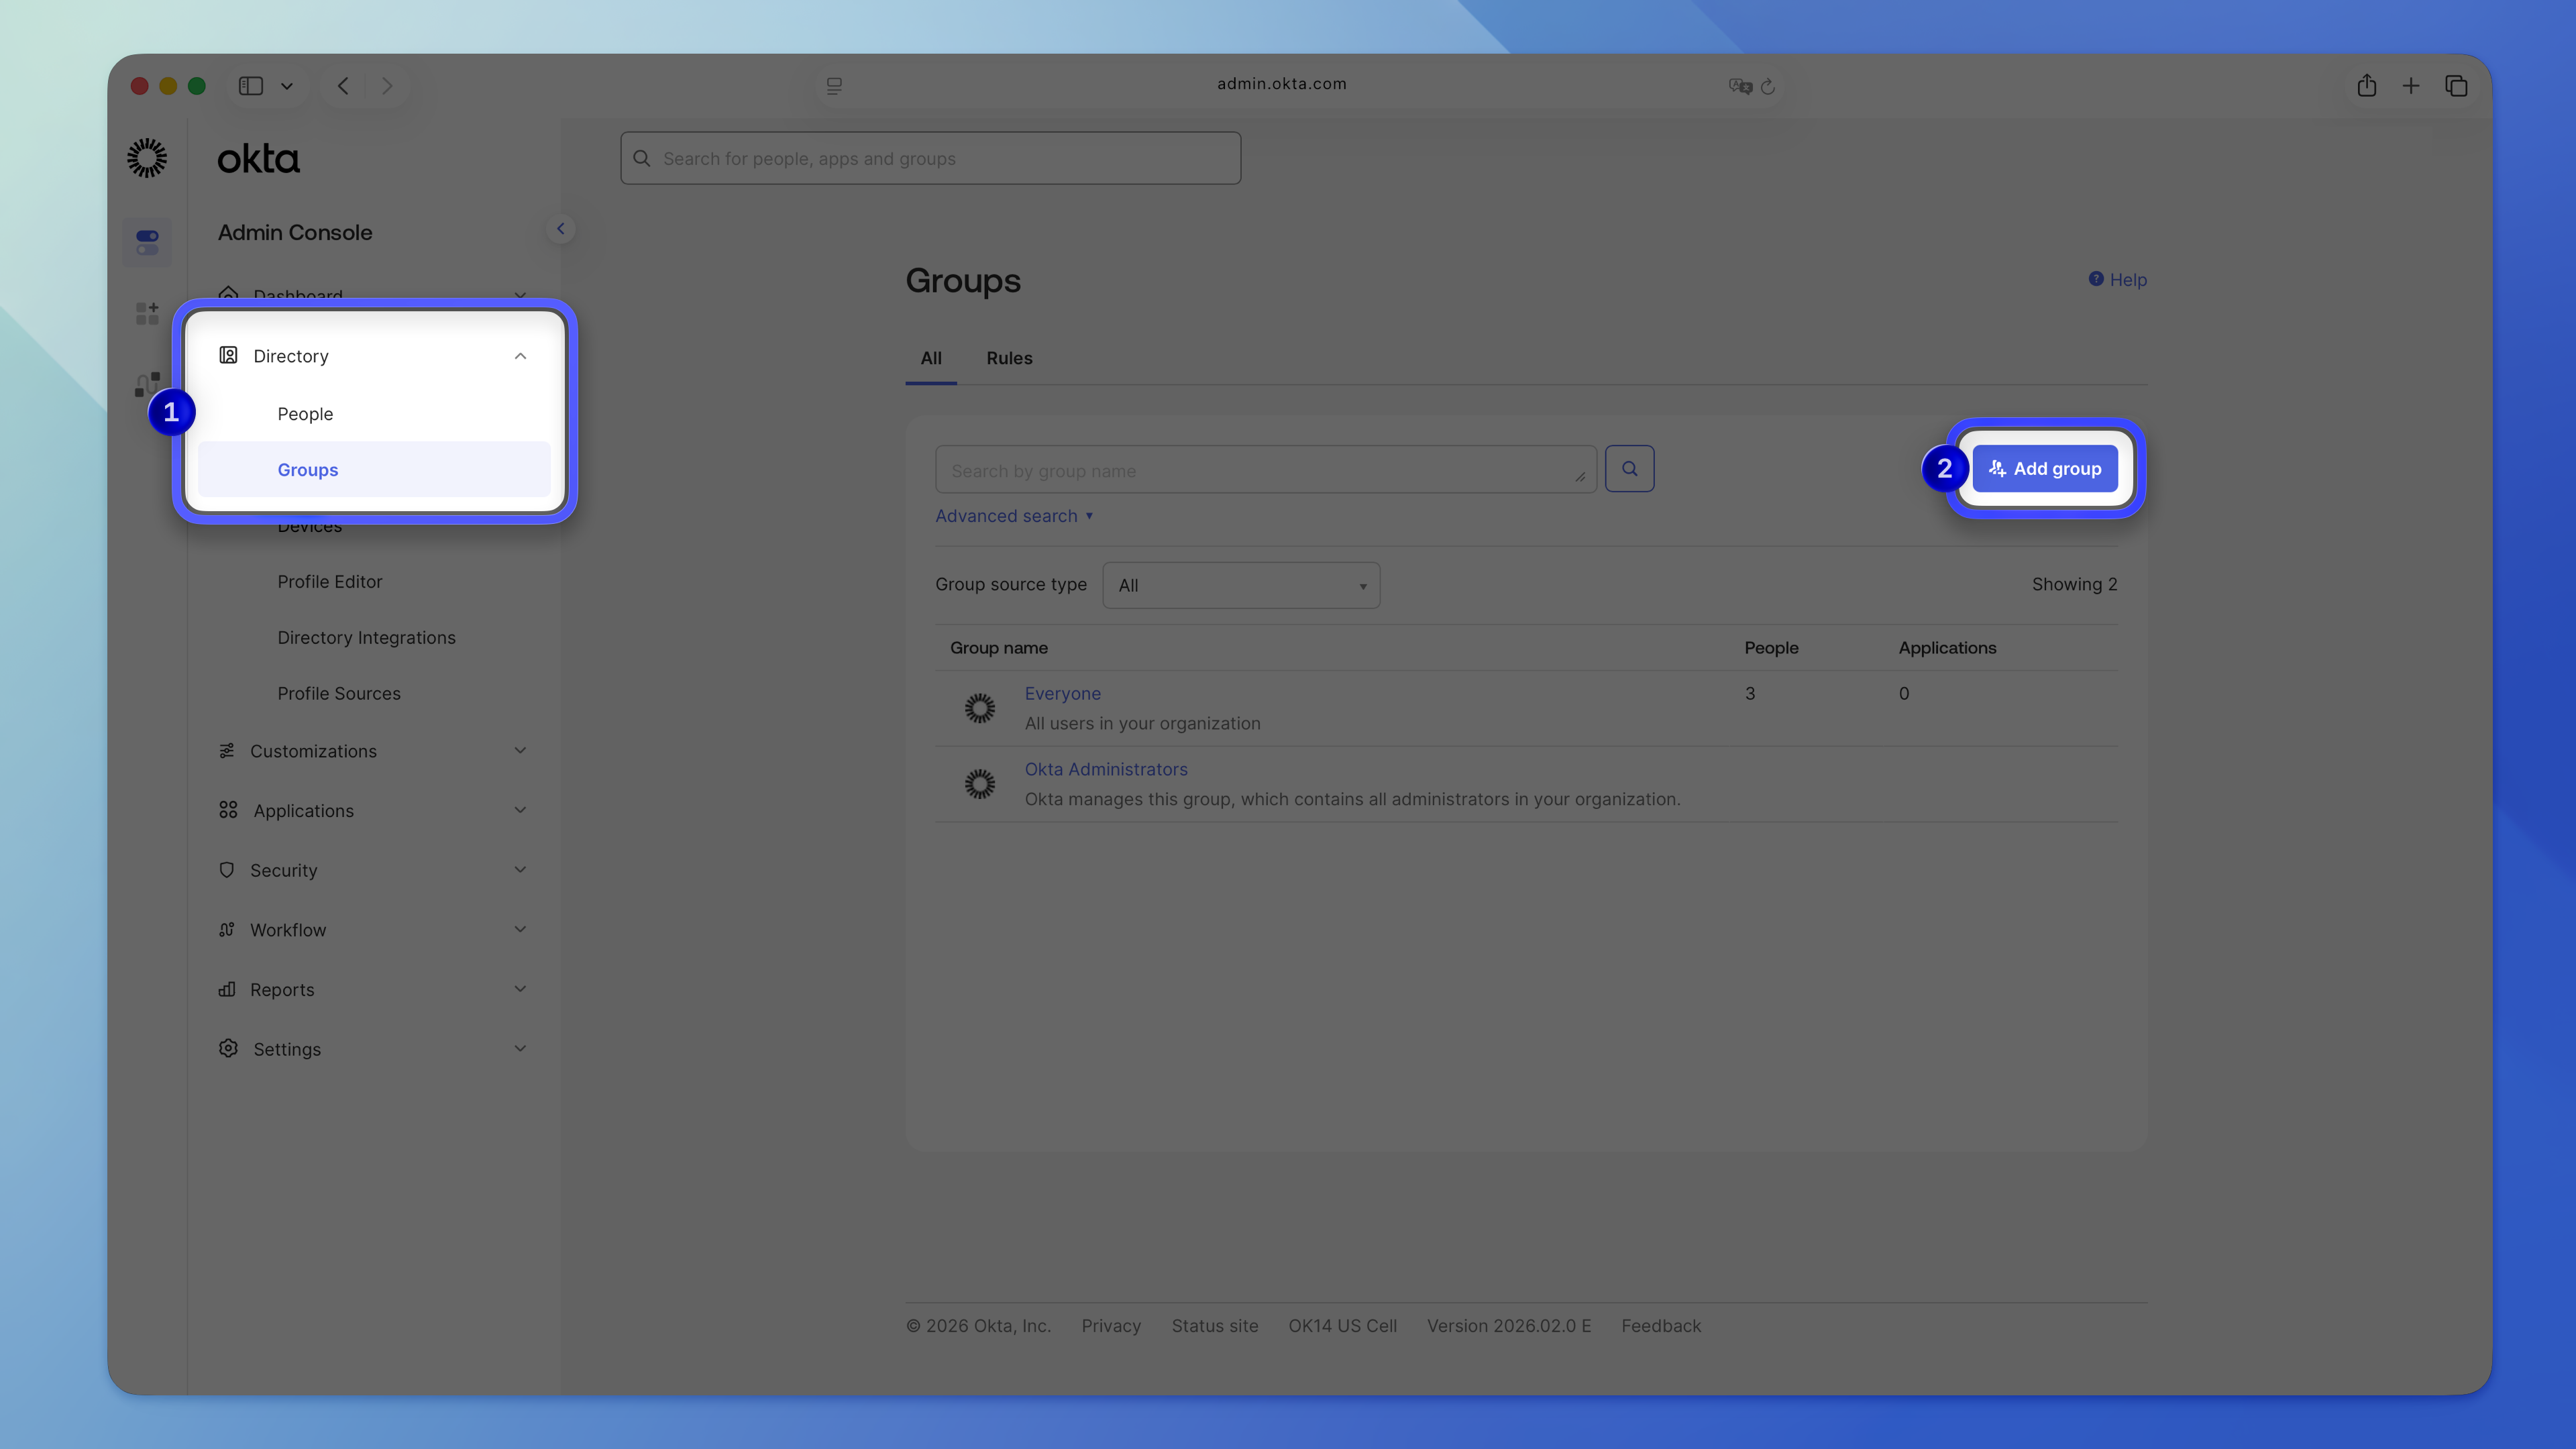
Create two groups to control which access level users get in your Sketch Workspace: editors or viewers.
1. Go to **Directory** > **Groups** and click **Add group**.
1. Name the group. Use a descriptive name, like `Sketch-editors` or `Sketch-viewers`.
1. Add users to each group.
### Create a custom attribute
You’ll need a custom attribute to control whether users are provisioned as Editors or Viewers in your Sketch Workspace.
1. Go to **Applications** and select your Sketch SCIM app.
1. Go to **Provisioning** > **To App**.
1. Scroll down to the attribute list and click **Go to Profile Editor**.
1. Click **+Add Attribute**.
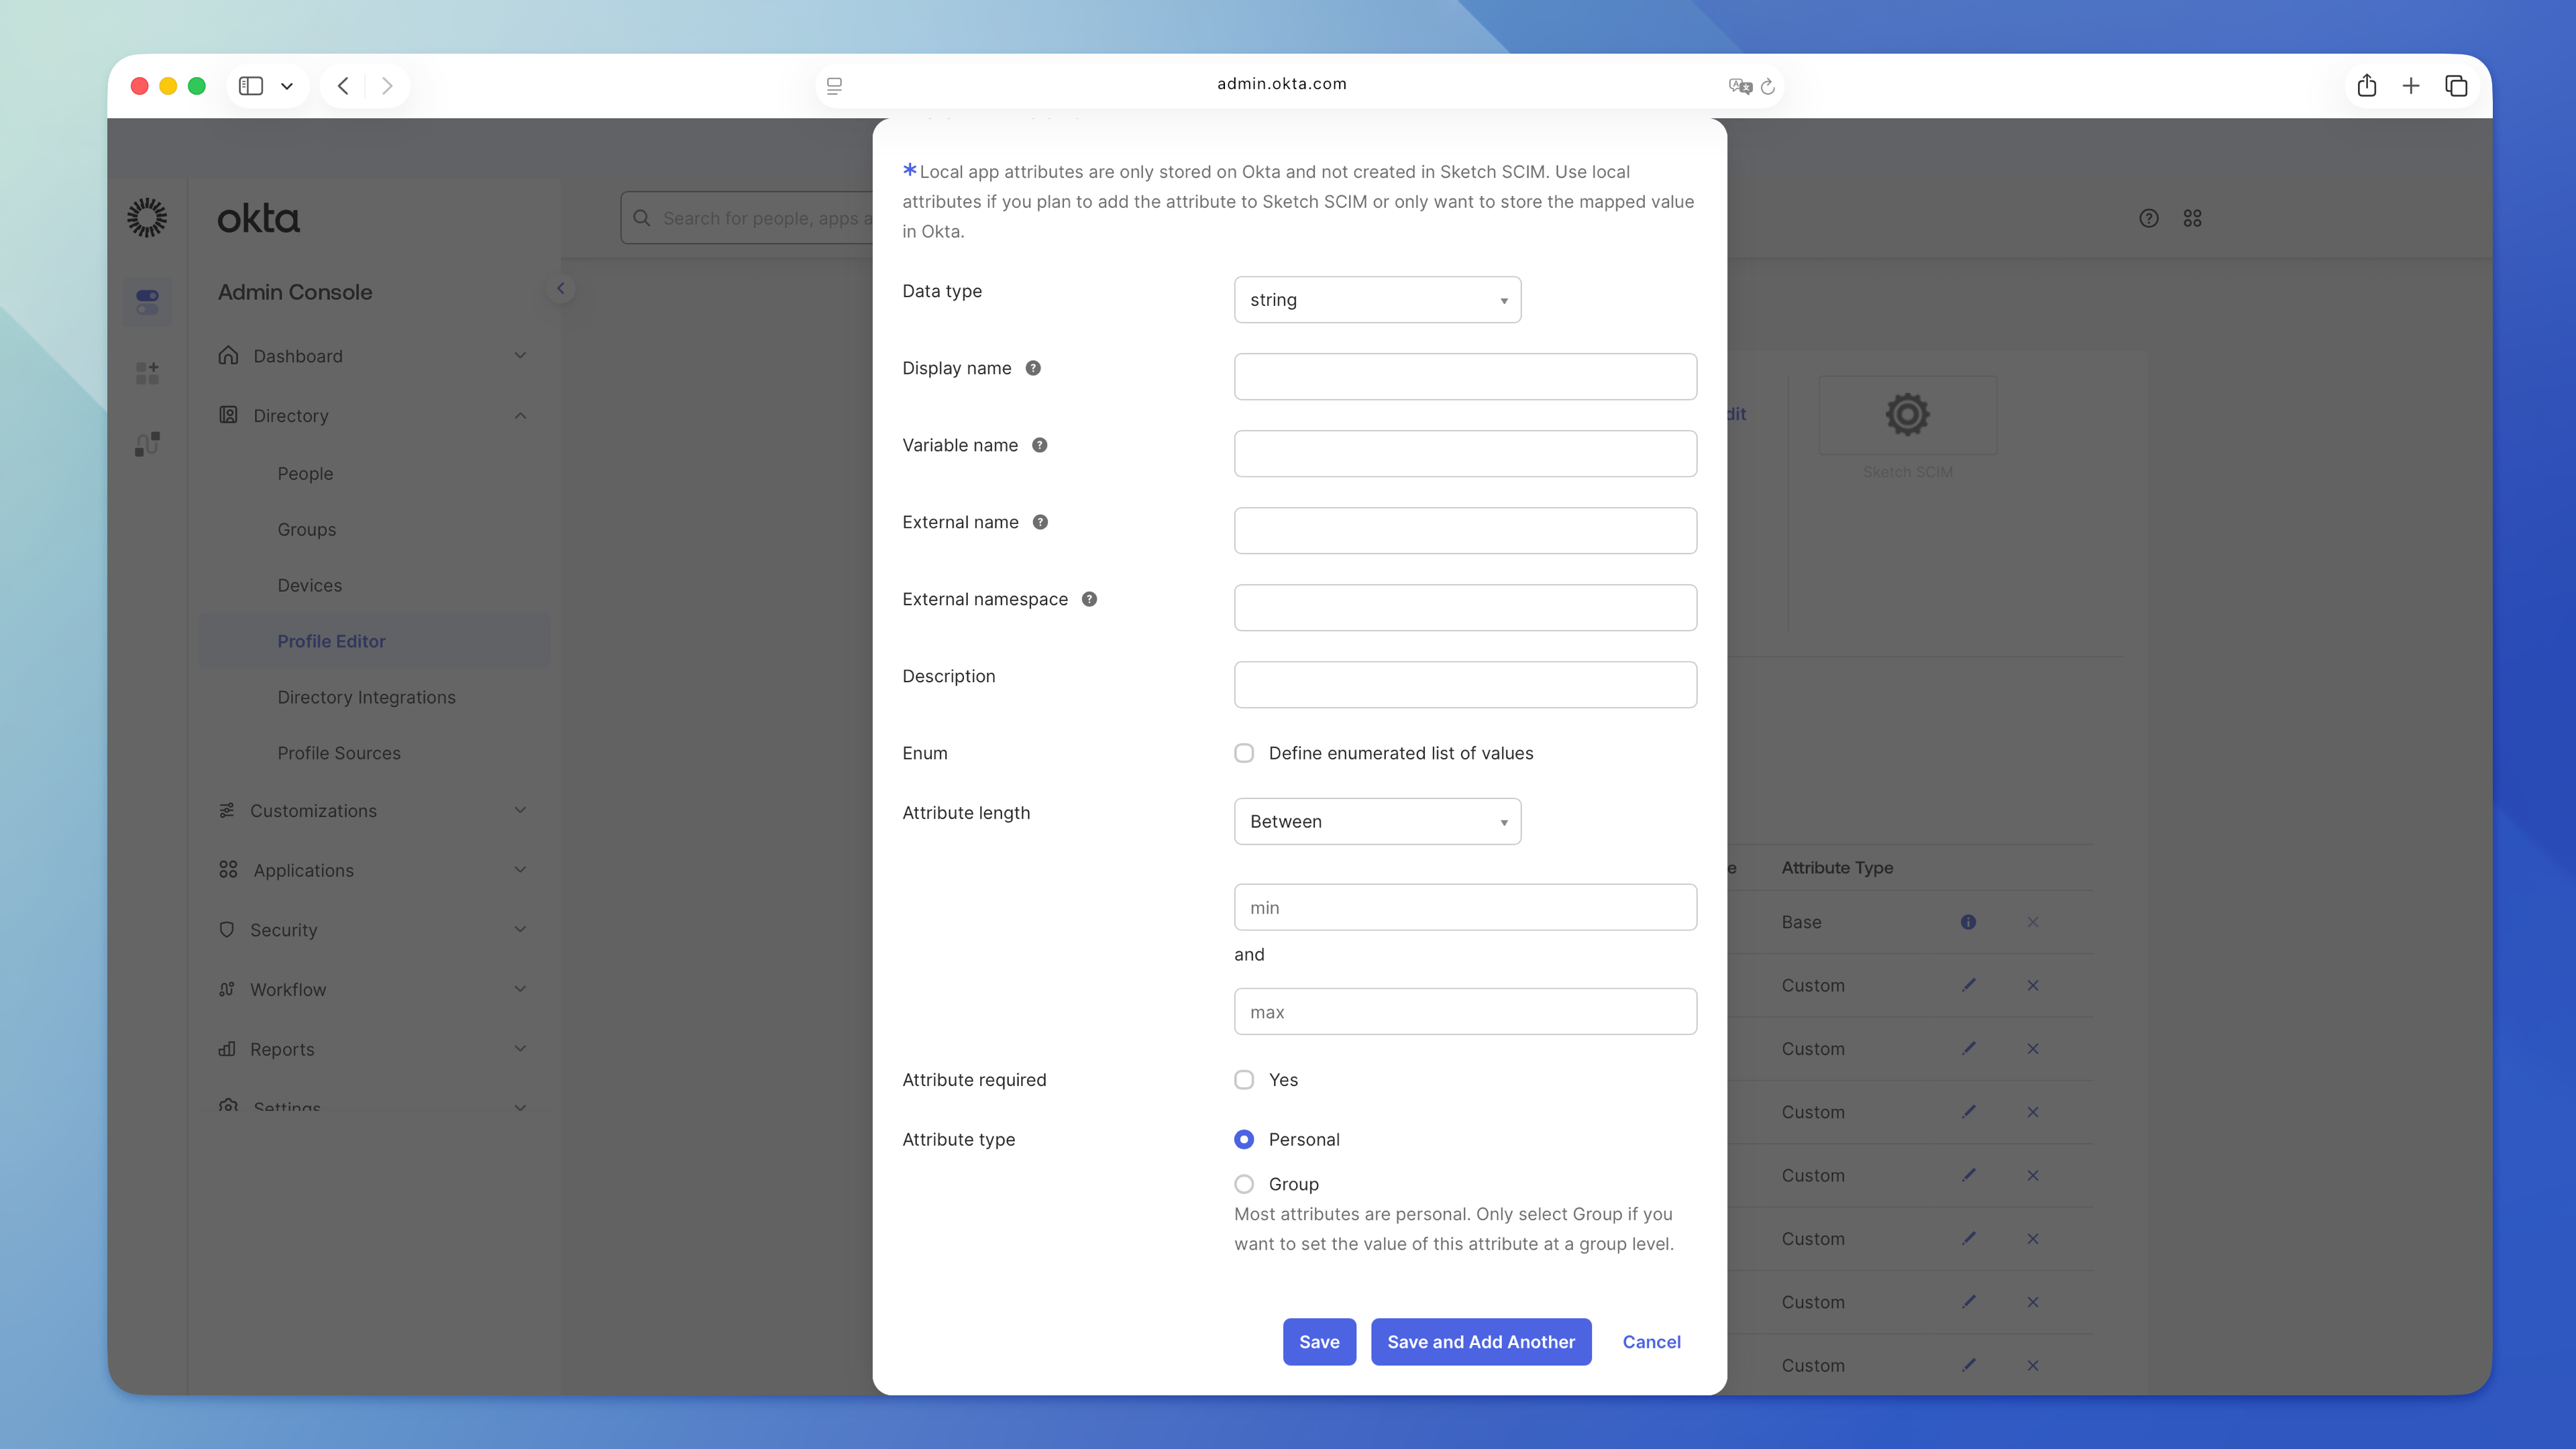
Fill in these fields:
- **Data type:** String
- **Display name:** Sketch Access Level
- **Variable name:** `accessLevel`
- **External name:** Okta sets this automatically to `accessLevel`
- **External namespace:** `urn:ietf:params:scim:schemas:extension:sketch:1.0:User`
- **Description:** optional
- **Enum:** Check this and add two values:
- Display name: `Editor`; Value: `editor`
- Display name: `Viewer`; Value: `viewer`
- **Attribute required:** No
- **Attribute type:** Group
Click **Save** to create the new attribute.
## 3. Activate provisioning
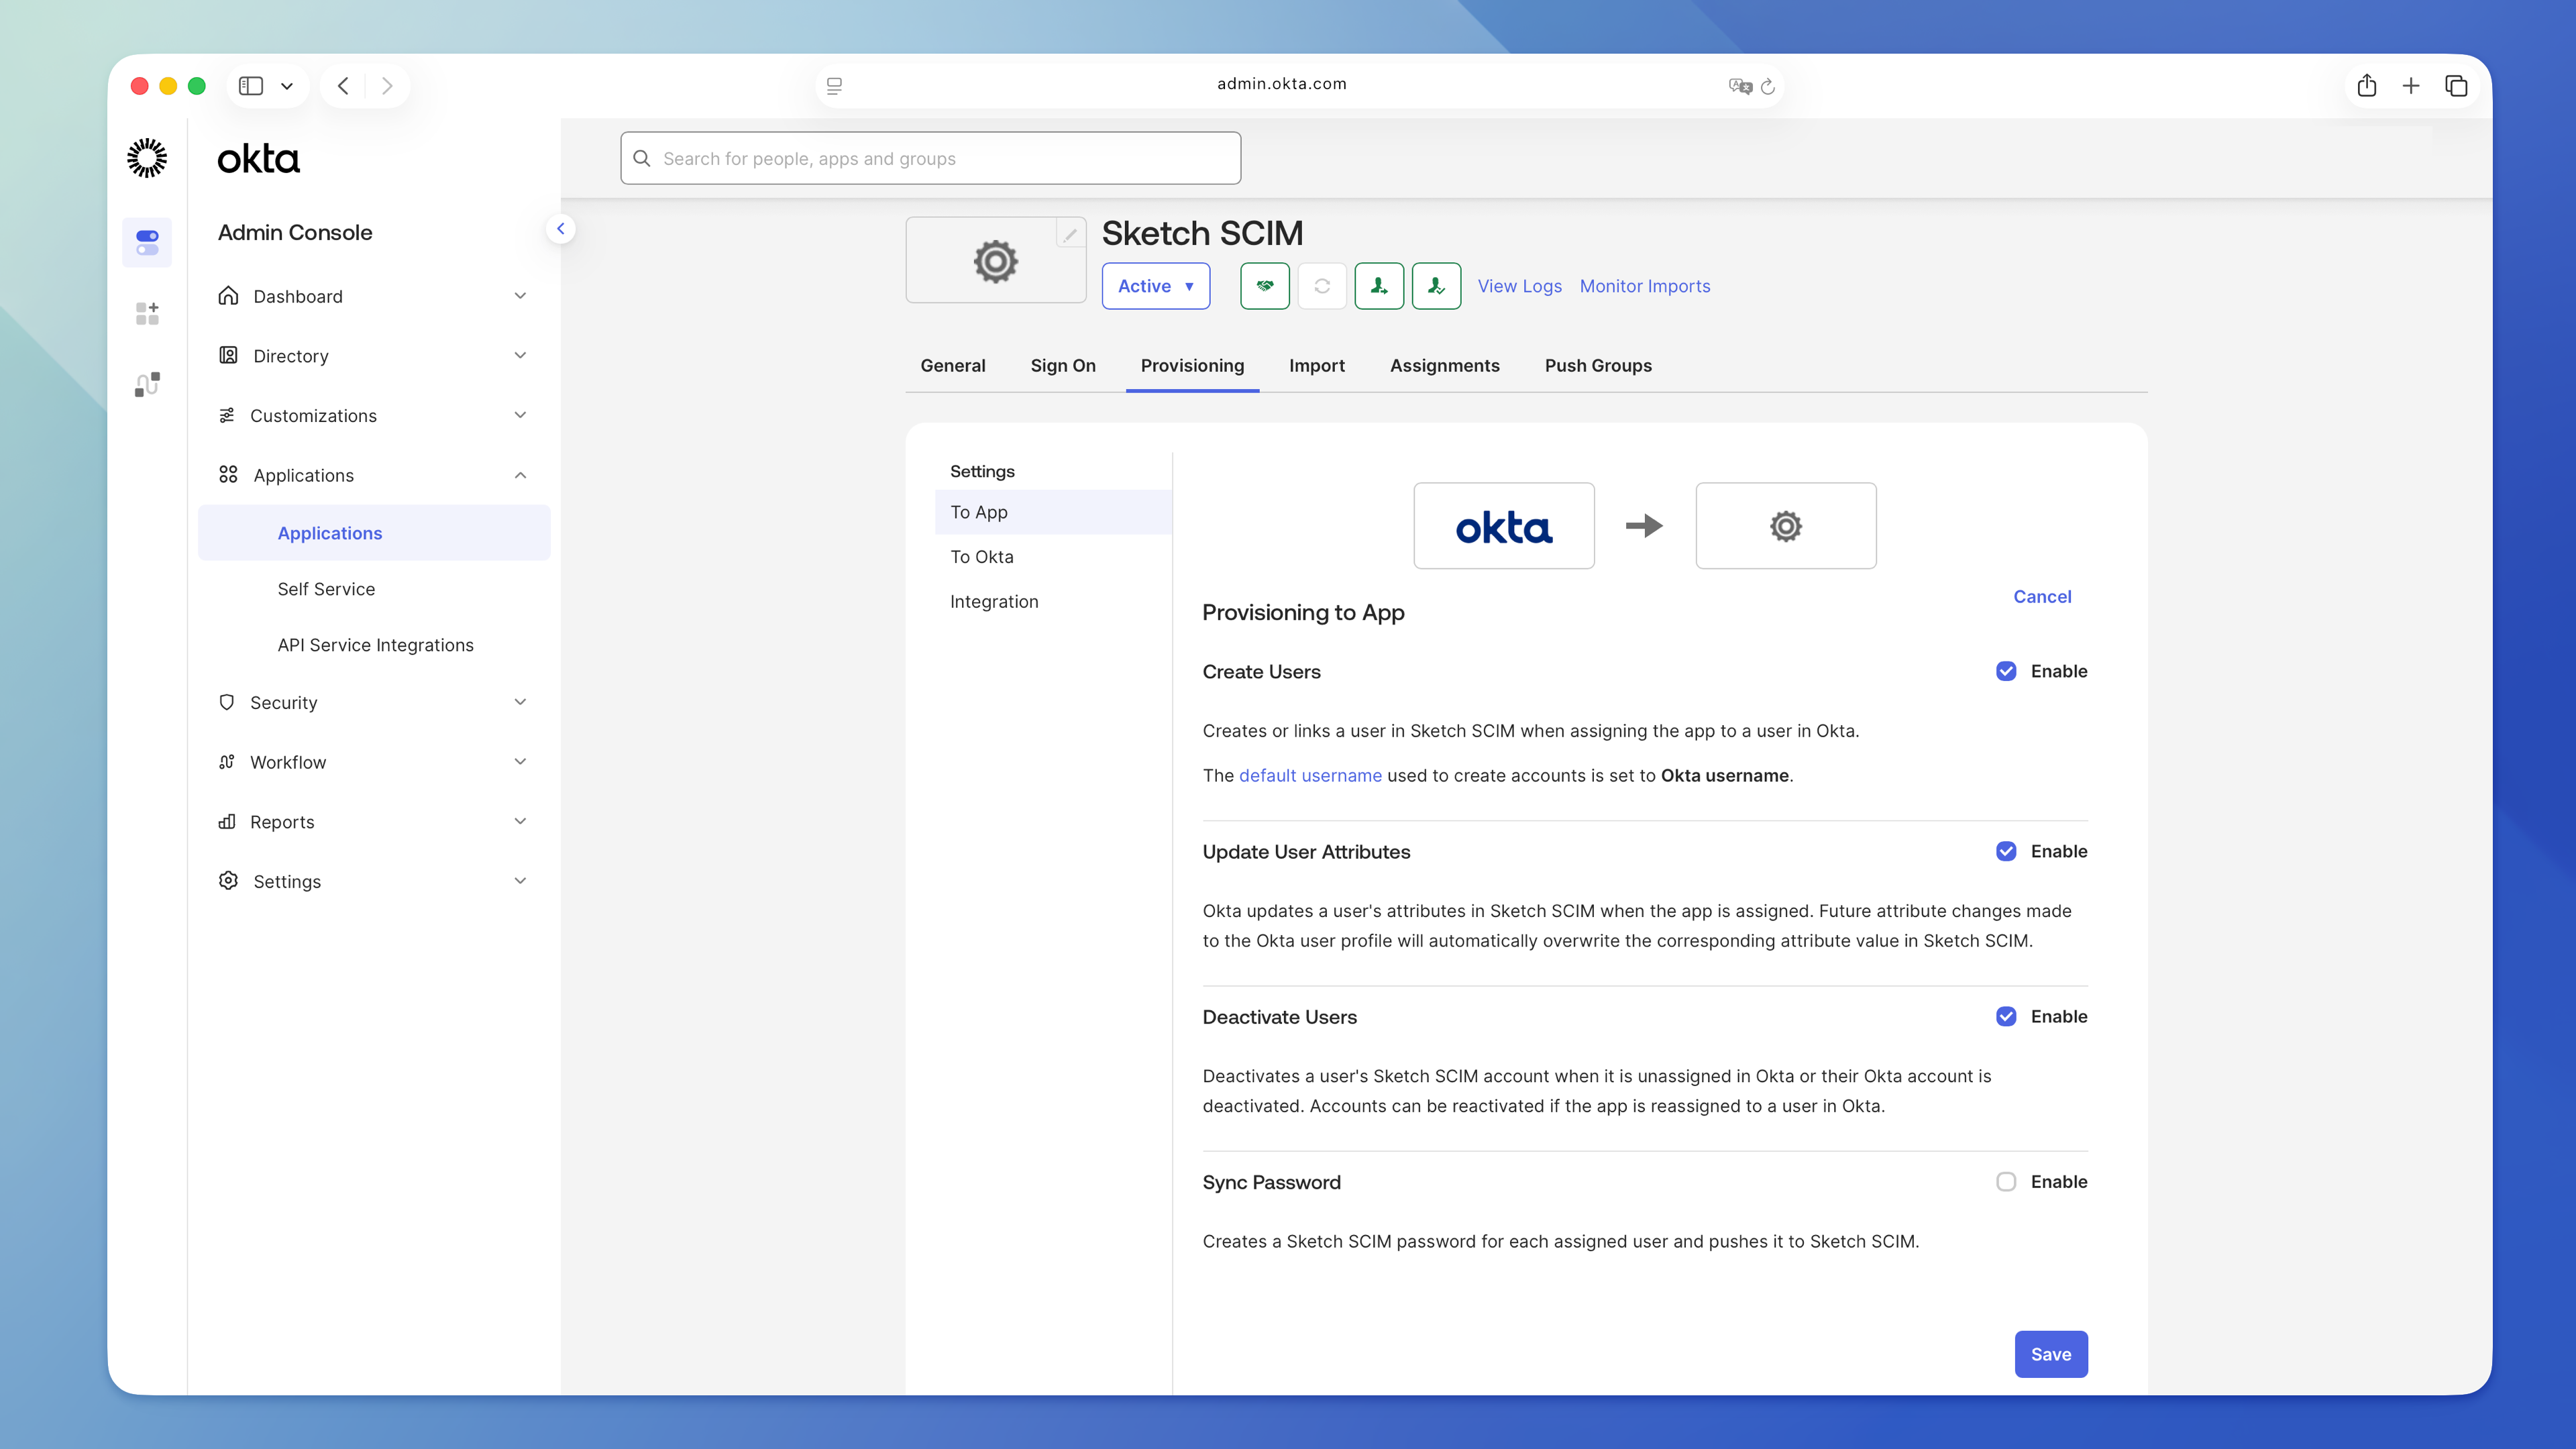
Activate provisioning before adding groups or users:
1. Click on the **Provisioning** tab.
1. Click **Edit** on the **To App** section.
1. Enable the following actions:
- **Create Users**
- **Update User Attributes**
- **Deactivate Users**
1. Click **Save**.
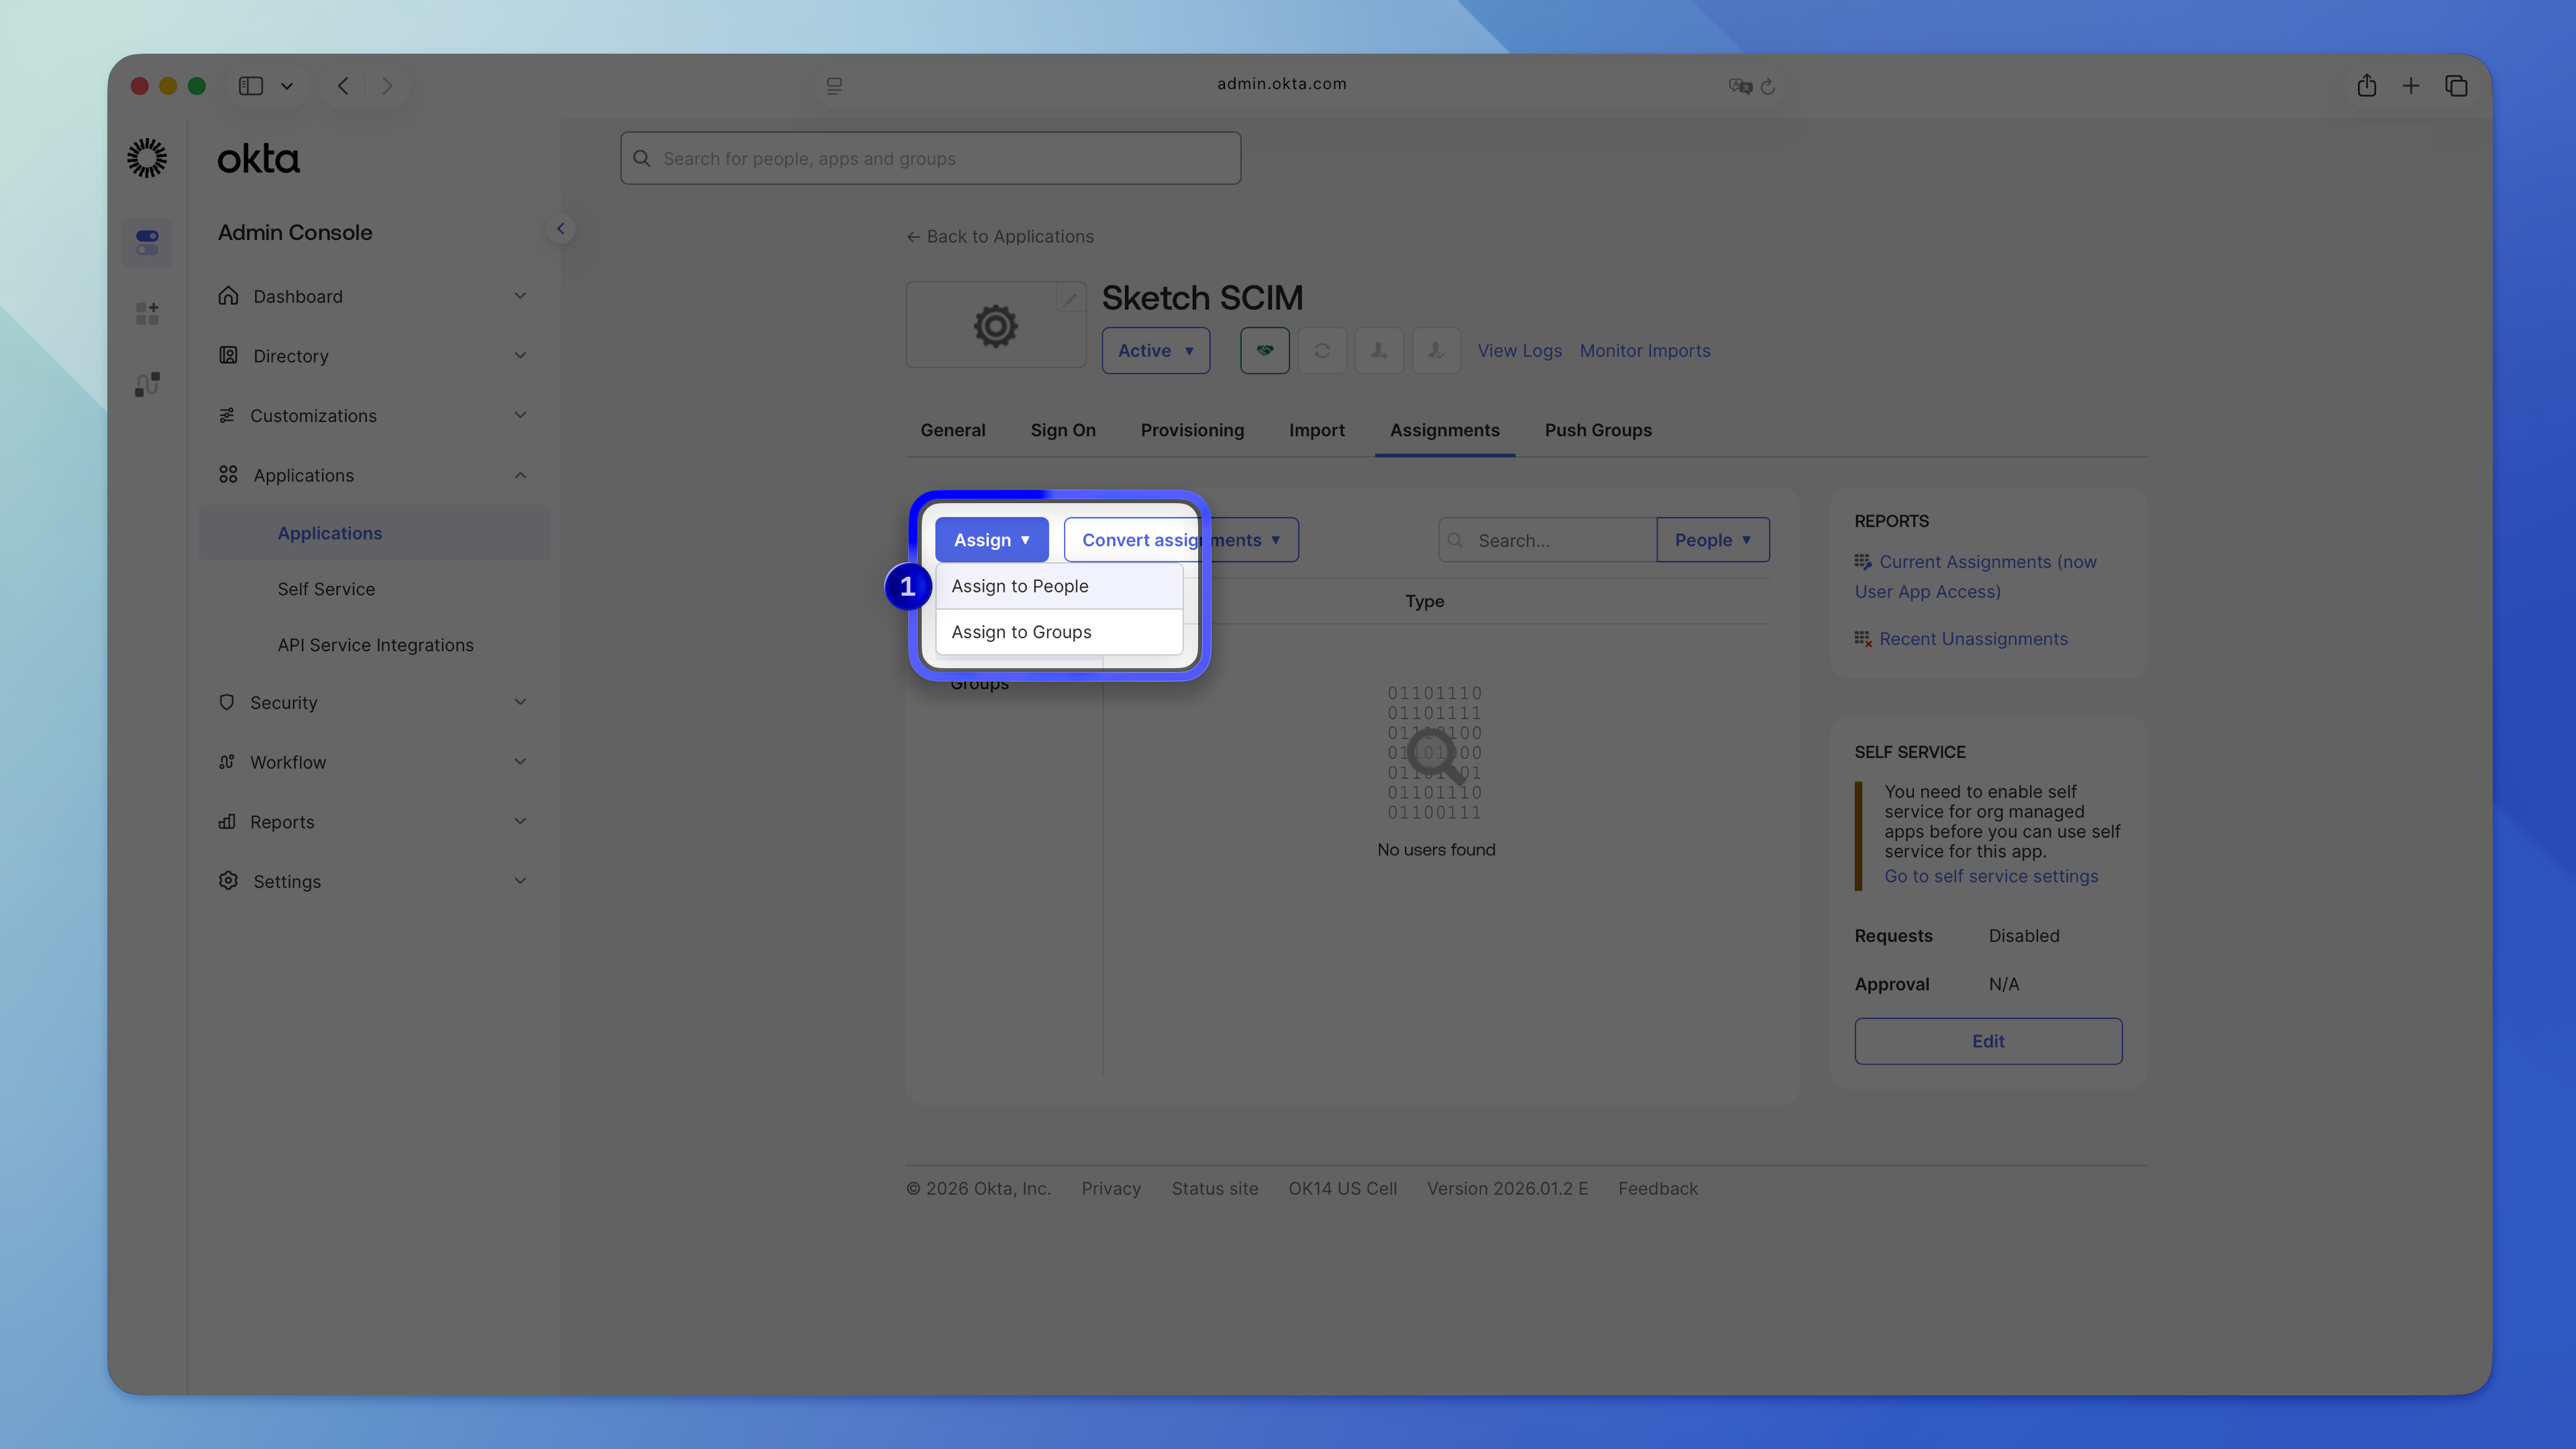
### Assign the groups to start syncing users
The last step is assigning groups to the custom app. This triggers user sync to create, update, or delete users in your Workspace.
1. Open your custom SCIM/SSO app.
1. Click on the **Assignments** tab.
1. Click **Assign** > **Assign to Groups**.
1. Select one of the groups and click **Assign**.
1. Scroll to the bottom and set the access level that matches the group (editor or viewer).
1. Repeat the same steps for the other group, so both groups are assigned to your app.
## Considerations
- If you reach your Editor seat limit, Okta will still provision the user, but we’ll add them as a Viewer to avoid unwanted extra charges.
- If you disable a user in Okta, they’ll be deleted from the Workspace. Any documents in their **My Drafts** folder will move to a restricted folder that Workspace Admins can access.
## Existing Okta SSO configuration
If you already use Okta for SSO, you’ll need to deactivate and delete the Gallery app, then create a new custom app to enable SCIM. The Gallery app doesn’t support SCIM provisioning.
Deleting the Gallery app won’t affect existing users or their documents. You don’t need to make any changes in your Sketch Workspace — Okta handles everything.
### Deactivate the Gallery app
> **Note:** Ask users to sign out of their accounts and quit the Mac app before you deactivate the Gallery app. Once SCIM configuration is complete, they can sign in again with the same credentials.
1. Sign in to your Okta account and open the **Admin console**.
1. Go to **Applications** > **Applications** and find the Sketch SSO gallery app in the list.
1. Deactivate the app. You need to deactivate it first, then delete it.
> **Note:** Once you’ve deleted the Gallery app, [go back to step 1](#1-create-a-custom-okta-app) to create the custom app and set up SCIM.