Restricting edit rights for individual documents
By default all Editors in your Workspace have edit permissions for all documents, but you can restrict editing access for any specific Editors — which is handy for important documents, like your design system’s Libraries.
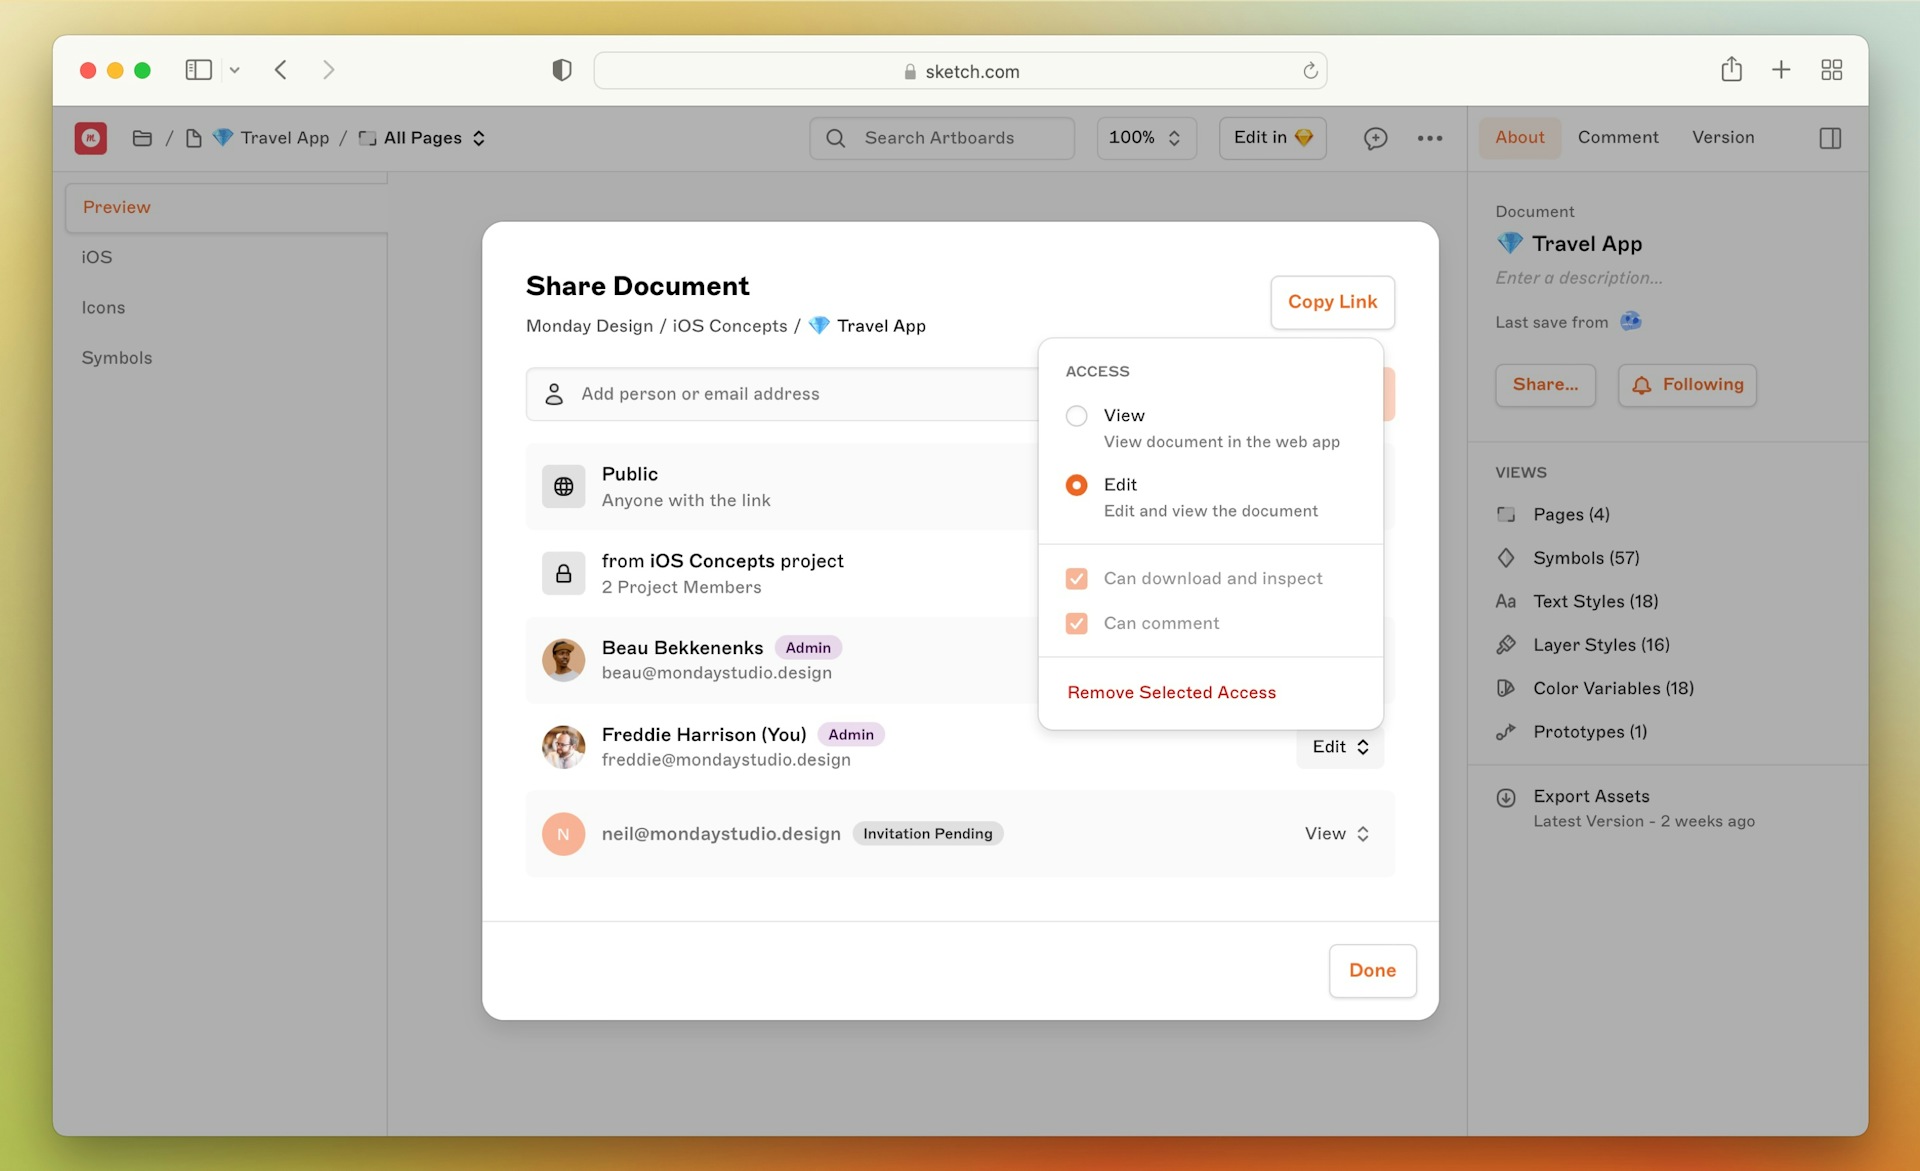
To control who can and cannot edit a document, head over to its Share settings. You can access these via:
- The
 button that appears when you hover over a document’s thumbnail
 - The
 in the Nav Bar when you’re viewing a document
How to access a document’s sharing settings
Managing editing rights
In your document’s share settings, you can add individual Workspace Members and set specific edit rights, or restrict editing rights for everyone in your Workspace (or in a specific project, if your document is part of a project).
Alternatively, you can just remove editing permissions for specific people. Simply add their email addresses, and set their permissions to View. See Sharing Documents.
You can change an Admin’s permissions to View if they don’t need or want to edit the document. However, only Admins can change their own permissions from View to Edit.
How to set an Admin’s permissions for documents in the web app
As an Editor or Admin, you can restrict access to projects for other Members in your Workspace in the web app. To do so, open the project’s share settings, head to the Everyone tab and select Cannot access unless invited to this project.
If you’re the author of a document and change your own permissions from Edit to View, you will no longer be able to edit the document or change your permissions. Your Workspace Admin will need to change your role to an Editor to restore your editing permissions.
Restricting access to new projects
By default, every Workspace Member will be able to see any project, along with its documents. However, you might need to restrict access to projects at a Workspace level when working with an NDA or collaborating on a project that’s still under wraps. In such cases you can manually restrict access to a project at a Workspace level and invite Members individually instead.
You can manually restrict access to a project through its share settings and enable individual access for any Workspace Member. Keep in mind that Admins in your Workspace will always be able to view all projects, regardless of their share settings. This way, even if all Workspace Members leave a project, Admins will always be able to access it.
You can only adjust access to projects through the web app. Once you’ve restricted access to a project, the Mac app will show you those and any other projects you’ve been added to — look for the lock icon to identify these projects.
Restricting access to new projects
When you create a new project in your Workspace, you’ll see a new dialog where you can enter its name and adjust its sharing settings.
In the project’s share settings, you can restrict Workspace-wide access by changing the drop-down menu option from Default to No Access. When you do this, only you and Admins in the Workspace will be able to view this project.
You can’t set a different access level for your Workspace (e.g. view-only access for everyone). Access levels are based on a Member’s role within the Workspace.
You can add individual Workspace Members here as well. When you’re done, choose Create Project.
Restricting access to existing projects
To restrict access to an existing project in the web app, open the project’s sharing settings in the web app and click the Share button in the top-left corner. You can also access the Share settings by hovering over the project’s name in the sidebar, clicking ![]() , then selecting Share.
, then selecting Share.
In the project’s share settings, select Cannot access unless invited to this project from the drop-down menu next to your Workspace’s name.
To add specific Workspace Members, use the search bar to find them and click Add.
Restricted projects and access levels
When you add someone to a project via its share settings, their access will be the same as their role within the Workspace. This means that an Editor will always have the right to edit and Viewers will only ever be able to view and inspect. Admins have full access to all projects, regardless of their Share settings.
You can still set document-level permissions within a restricted project. For example, you can give a Workspace Member access to a specific document but not the project as a whole. This way, they’ll only be able to see the document you’ve shared with them instead of the entire project’s contents. If you’re invited to a document within a restricted project, the document will appear in your Shared With Me view, but you won’t be able to see the project itself.
You can only add Workspace Members to restricted projects. However, you can still give document-level access to Guests, even if the document is within a restricted project.
Workspace Guests

You can invite anyone to a document in your shared Workspace as a Guest, and choose whether they can view or edit the document. Unlike normal Workspace Members, Guests can only see specific documents you share with them.
Guests with View permissions can simply open and view the document in the web app. Guests you add with Edit permissions will need to be a Member of another Workspace or have a valid Mac-only license and Sketch account to edit the document in the Mac app.
You can edit Guests’ permissions by managing the document’s Share Settings in the web app.
Accessing documents as a Guest
If someone shares a document with you and you’re not a Member of that Workspace, you’ll first need to accept their invitation via email, or by opening the link they share with you.
Once you’ve accepted the invitation, open the web app and sign in with your Sketch account. Open the drop-down menu in the top-left of the screen — here you’ll see any Workspaces that you’re a Member of, along with any Workspaces you’ve been invited to as a Guest. Select the Workspace that holds the document you want to view.
From here, you can view the document in the web app. If the person who invited you gave you Edit permissions, you can also open the document in the Mac app.
Using the Permissions Directory
The Permissions Directory is only available to customers on our Business Plan. Please contact us if it isn’t activated in your Workspace.
With the Permissions Directory, you can get an overview of all the Members and Guests in your Workspace — and easily manage which documents they have access to.
You’ll find the Permissions Directory under the People tab of the People & Settings page in your Workspace. You can search for specific people, and filter between full Workspace Members or Guests invited to specific documents. For each Member or Guest, you can see an overview of the documents they’re a part of, edit their permissions, or remove them entirely.
In the People & Settings page, you can browse a full list of Members and Guests in your Workspace — and edit their permissions
To see which documents a Member or Guest has access to, as well as the type of access they have, click the ![]() button next to their name and choose Document & Project Access.
button next to their name and choose Document & Project Access.
To change a member or Guest’s access to a document, click on the access type next to the document name and select the relevant options. From here, you can also remove a Member or Guest’s access altogether by choosing Remove Selected Access. When you’ve made your changes, click Done.
The Permissions Directory gives you an at-a-glance view of the documents any Workspace Member or Guests has access to — and an easy way to edit their permissions
Removing a Member or Guest from your Workspace will also revoke their access to all documents within it. To do this, click the ![]() button next to their name on the People & Settings page and choose Remove from Workspace (for Members) or Remove from All Documents & Workspace (for Guests).
button next to their name on the People & Settings page and choose Remove from Workspace (for Members) or Remove from All Documents & Workspace (for Guests).
Creating and managing Member groups (beta)
Creating and managing groups is currently in beta and will be available with the Business Plan.
If you’re a Business Plan customer and are a Workspace Admin, you can create groups of Members. Groups make it far easier to give lots of Members access to specific projects and documents — instead of manually adding people one by one.
Creating new groups
To create a new group, click Create Group. Give your group a name, then enter one or more Member’s names or emails and click Add. When you’ve finished adding Members, click Create Group.
How to create a group of Members for faster sharing
Viewing and managing groups
To view existing groups, open the web app and click Settings at the bottom of the sidebar, then click Groups in the menu. From here you can create new groups, or view and manage groups you previously created.
You can manage access to projects and documents, edit Members, rename and delete groups by clicking the ![]() next to a group’s name.
next to a group’s name.